Showing posts with label car. Show all posts

Sunday, August 25, 2019

Spitfire Update: Doors, Windows, and Brakes

Decades of age have had quite a toll on the interior and trim pieces of my Triumph Spitfire conversion.

The original side window rubber and interior panel...


They're long overdue for a change.


Before and after to see how bad they were...


Old interior panel off...


And while I have the door open, replaced the non-functioning exterior door handle...


Looking good!


In addition to the cosmetics, I also had to address the brakes. After each winter, I had problems with brakes seizing on me and it had only been getting worse. I was recommended to put in stainless steel brake lines to help prevent the flexible lines from absorbing moisture from the air.

Old lines...


New lines...


The same hard line connection that gave me problems many years ago gave me problems again. Many years ago I couldn't get the flexible to have a good seal on the hard line. I ended up having to take it into a shop to finish the brakes. This time disconnected the hard line piece and found threading damage halfway down the nut. Based on the damage, I can't imagine it was anything I could have done - must have happened long before I owned the car. The shop many years ago just must have managed to push hard enough while tightening to overcome the bad threads.


Thankfully a business nearby could quickly and cheaply create a replacement.


And now the car is running great!

Hopefully it won't have to look like this again anytime soon...


Sunday, May 10, 2015

Electric Car 240V Charger

What happens when you buy an electric car?

You fill up the tank in your gas car so rarely wasps build a nest under the gas cap!


The Ford Focus electric came with a 120V charger that can plug into a standard U.S. outlet, but it takes 20 hours to charge the car from empty. We had a few times in which we couldn't take a second trip in the car because it was still charging; it was time to get a 240V charger.

I decided on the Juicebox Classic 30 Amp:
 - Rather than being hard wired into the house, it plugs into a standard NEMA 14-50 outlet (common among RV parks). You can also use an adapter to plug into typical dryer outlets. That gives me more options on where to charge.
 - The 30 Amp model meets/exceeds the ability of the car's onboard charger (without going overboard).
 - Long charging cable.
 - It's simple!
 - It's cheap!

Some more advanced chargers allow you to set a delay before charging or report to a smart phone app the charging status, but I didn't need any of that. The car itself allows me to set charging times, and I can use the Ford mobile app to check the charging status. There isn't even a power switch on the Juicebox Classic. When you plug the J1772 into your car, charging starts. Unplug, charging stops.

Please note: I am not an electrician. I just did lots of research on the Internet, spoke with a couple electricians, and managed to put something together that passed the city inspection. (And most importantly not burn down my house.) Don't trust anything I say or did!

Thankfully the distribution panel in my garage has plenty of room.


There are 2 hot leads coming into the panel: the thick red/black wire connected to the top left of the panel and the thick black wire connected to the top right of the panel. Each lead is 120V AC. The 2 leads combined supply 240V.

The white wires along the right side of my panel are the neutral. A 120V outlet will use one hot (either one) and the neutral. The Juicebox doesn't need a neutral wire as it doesn't require a 120V source. However I'll be including the neutral in my 14-50R outlet as who knows what it will be used for in the future.

The bare copper wires along the left side of my panel are the ground.

You can see each one of the hot leads is connected to a bus bar with blades that criss-cross down the panel for the circuit breakers to snap into. A 120V circuit breaker will only snap into one of those blades. A 240V circuit breaker will snap into both blades.

Very educational site / video on this: http://www.askmediy.com/install-220-volt-outlet-4-wire-dryer-outlet/

Shopping list:
 - NEMA 14-50 Outlet
 - Outlet Enclosure
 - 2x Romex Connectors
 - 6/3 gauge Romex cable (6 gauge for the 2 hots and neutral; ground slightly thinner)
 - Cover plate
 - 40 Amp 240V Breaker (Although my plug and wire are rated up to 50 Amp, my charger should only be pulling 30 amps.)
Total about $40

I cut away a section of drywall below my panel to install the new outlet.


AFTER SHUTTING OFF POWER TO THE DISTRIBUTION PANEL....
 - Mounted the outlet enclosure into the side of the stud below the panel.
 - Punched out a hole in the bottom of the panel.
 - Fastened the two connectors (one at the new hole in the bottom of the panel and one at the top of the outlet enclosure).
 - Pulled the Romex cable through the enclosure and into the electrical panel.
 - Tightened the two connectors onto the cable.
 - Connected the wires to the 14-50R outlet. It was very easy - there were labels for the two hots, the neutral, and the ground. Just strip back a little bit of insulation and tighten down on the terminal with a screwdriver. Honestly the hardest part was jamming the outlet with those fat 6 gauge wires into the enclosure.
 - Triple checked everything.
 - Connected the wires to the distribution panel. I stripped back the insulation from the wires as necessary to connect the 2 hot wires directly to the circuit breaker and the last 6 gauge wire to the white neutral bar. The bare copper wire connected to the ground bar. (You'll notice I tried to keep things tidy with the wires going along the outside of the panel.)
 - Triple checked everything again.
 - Reattached the drywall.
 - Turned on power to the panel.
 - Triple checked everything yet again. (You've got a multimeter, right?)
 - I was done! (Well I had to wait for the inspector the next day, but I was basically done.)


JuiceBox installation was stupid easy. You attach the mount to your wall (on studs of course) then the box just slides in from above. Plug in the 14-50 cable into your new outlet and it's powered.


Charging from empty is now only 3.5 hours! Multiple long trips in the car in one day are no longer a problem.

Again, I'm not an electrician so don't trust a word I'm saying. Consider me nothing more than another data point on your quest to get a 240V charger installed. :-)

Friday, March 13, 2015

2013 Ford Focus Electric

As you could tell from my very first post, I'm really into electric cars. I enjoy doing basic mechanical work on my own cars (oil changes, spark plugs, etc), but it's even better if the car doesn't ever need it!

The Spitfire is a fun good-weather car to cruise with the top down to the local store. It's however not practical for a commute. I've been looking at production electric vehicles for years, but they're either too costly for me or too difficult to find. The Nissan Leaf is probably the best notable exception, and my wife and I did take one for a test drive. I don't want to convince anyone to not buy that car, but for us it lacked a little too much in space, power, and looks appeal. In terms of electric cars it is a solid option if you can't afford a Model S.

I searched for the Ford Focus Electric on and off for years but could never find one for sale anywhere in the state of Texas. That is, until this past week. A Ford dealership in Austin had a 2013 Focus Electric for sale, so the wife and I tried it out. It looks good, has just enough room for our monster stroller in the back, and feels good on power. We bought it.


I tried to find detailed numbers on range (and how it varies based on A/C, driving conditions, etc), but I didn't have any luck. So I'll do it here! I've only had the car for a week, but I'll update the numbers here as I get more experience with the car.

From what I can tell, the car's reported maximum range takes into account driving history (aggressiveness) and climate control. Ford advertises a range of 76 miles. When I picked the car up from the dealership the driving history showed quite a few lead foots had been test driving it. That's understandable as test drivers want to see what the car can do (including myself). At the dealership, even fully charged, the car only reported 63 miles. It wasn't until I drove the car for an hour to clear off that aggressive driving history that the range finally reported >70.

Range Statistics


All of the following data points are from my very initial experience with the car. I'll refine / expand them more as I get more time with it.

The car reports the driving history on a scale of 0 to 6 (Wh/mi x 100):
Coasting - 0
Level 65 MPH - 3
Heavy acceleration - 6

Rules of thumb from full charge:
- Climate control reduces range 12 miles
- Fairly aggressive driving reduces range 12 miles

Since Ford says 76 miles, that's about a 15% reduction on range for either condition. Those are additive - turn on your A/C and drive aggressively and there goes more than a quarter of your range. I haven't figured out the climate control yet. Having the A/C on doesn't automatically cut the range; it's heavily dependent upon the temperature you set inside the car. (Also I've had the A/C blowing cold air without any drop in range, but other times I've seen significant drops.) More experimentation will have to be done.

So some data points to help others interested in the car... (I bet these numbers would apply well to the Leaf / similar electric vehicles.)

Outside temperature cool (50 F to 60 F).
Interstate Highway Driving.
Light on the pedals.
Power consumption history averaging about 3.
No climate control.
Range: 63 to 74 miles

Outside temperature cool (60 F).
Country Highways.
Fairly aggressive driving.
Power consumption history averaging between 3 and 6.
With climate control set to 67 F.
Range: 57 to 59 miles

Outside temperature cool (60 F).
Mostly Interstate Highway, some lower speeds.
Light on the pedals.
Power consumption history averaging just under 3.
No climate control.
Range: 72 to 81 miles

Outside temperature warm (75 F).
Mostly Interstate Highway.
Light on the pedals.
Climate control on (A/C blowing cold air).
Range: 80 miles
(While driving, the range did make a sudden drop of several miles. I assume that was caused by the climate control.)

Outside temperature cold (32 F).
Country Highways / Interstate.
Climate control off.
Range: 60 to 65 miles

Outside temperature cold (32 F).
Country Highways / Interstate.
Heater on.
Range: 42 to 46 miles

Highest reported range: 83 miles
!! UPDATE in August 2016 !!
Highest reported range: 95 miles (Prior trip involved a lot of stop and go driving in heavy traffic.)
!! UPDATE in January 2017 !!
Lowest reported range: 42 miles (Freezing temperatures and heater on.)

I feel the car has a reliable 60 miles range - that's the maximum distance I would plan a trip for that didn't have charging along the way. That 60 miles includes highway driving with gentle hills, easy on the accelerator, and limited climate control.

How accurate is the range?


I've seen the car's estimated range from a full charge to be anywhere from 57 to 81 miles. So how accurate was it?

I've noticed the initial / full-charge range it gives is heavily dependent upon the driving history (maybe the last hour of history).

I've had a full charge report 64 miles, made a long trip, recharged, then had it report 74 miles.

Similarly, I've had a full charge report 74 miles, made a long trip, recharged, then had it report 64 miles.

So is it accurate? It seems to be if you're driving similar conditions to your previous trip.

What about when you're almost out of power? Does it suddenly drop from 5 miles range to 0? When we test drove the car, it only had 6 miles range on it. We made a 5-6 mile test drive and pulled back into the dealership with either 0 or 1 mile range remaining. So I'd say the range is accurate even at very lower values.

When you're driving, the car reports 3 distances: Range, Budget, and Status

At the start of the trip, both range and budget are identical; status is 0. The budget miles decrement based on actual distance traveled. The range miles vary based on your battery charge remaining, climate control settings, and driving history (Wh/mi). The status is just the difference between the budget and range.

Positive status mean you're doing better than your budget (good job!). Negative status mean you're doing worse than your budget (uh oh!). If you had planned a trip that really pushed to the limit of your range and you start seeing negative status, then you know you need to make adjustments (slower driving, turn off climate control, etc).

If your current drive is exactly like your previous drive (accelerations/braking, hills, cruising speeds, etc all the same), then budget generally equals range (status stays near 0). Taking climate control out of this, I've seen the status on drives easily range from +8 to -8!

Cost of Electricity


My electric costs $0.0962/kWh. The car's battery holds 23 kWh of charge. Rough calculation of $0.0962 x 23 = $2.21 to "fill up".

Two big assumptions with that cost:
- As least for LiFePO4 batteries, you don't want to discharge them beyond 80%. I wouldn't be surprised if Lithium-Ion can do better, but I still doubt Ford allows the batteries to discharge to 0%. (Meaning even if the car reports 0% battery, I really only need to charge 18.4 kWh, not 23 kWh, to reach 100%.)
- There are going to be losses with the charger; I just don't know how bad they are.

So if we assume a typical daily drive of 40 miles; that is a rough cost of $2. It will be interesting to see the next electric bill - will it only be up $60?

!!! UPDATE !!!
I got my electric bill! I purchased the car within a day of my billing cycle so the difference between the bills is a good indication of the effect of the car.
March bill: $163.83
April bill: $129.08
So even with doing the majority of driving with the electric car, the bill went down! Apparently electricity for the car is minor compared to the air conditioner / heater.

Summary


At this point we are VERY happy with the car. It's not for everyone, but it could be for a lot of people. I'd say it's contingent on the following conditions:
#1 Have a second gas car to drive for longer trips.
#2 Majority of trips are under 60 miles.
#3 Don't have frequent detours that could push you over 60 miles.
#4 Have a place to charge at home.


Wednesday, November 19, 2014

Electric Car Conversion

Back in July of 2008, I purchased a 1978 Triumph Spitfire convertible with the intention of converting it to full electric. The car officially became street legal in October of 2009. As I've already detailed out the construction of the car in my previous blog, I won't be repeating it here (future posts here will be far more how-to!). The full blog of the conversion can be found at: 78electricspitfire.blogspot.com

Being bright yellow and transforming from gas to electric, the car's name unsurprisingly became Bumblebee. As with any project, there is always room for improvement, but right now the car is "complete".


By the way, the car is pretty small...


Under the hood...


In the trunk...


Why?

I really think electric cars are the future. Their potential for performance is undeniable (see Tesla). They're far simpler than their gasoline counterparts which means less maintenance and outstanding reliability. Electric cars generally don't have transmissions, complex cooling systems, exhaust systems, fuel systems, or oil changes. The future of electric cars has even more potential. Electric motors have a single moving part (rotor), and in the future hub style motors mean cars won't even need an axle or differential!

So basically I really wanted an electric car, but there weren't any I could buy! I found an outstanding website www.diyelectriccar.com with a forum full of like minded and helpful individuals. I also read several other blogs online of people posting their own stories of car conversion. An excellent one is www.kiwiev.com

Design

The goal of the conversion was a small / fun convertible with minimal weight. The more I could drive down the overall weight, the greater the range and acceleration with fewer batteries and smaller components. I didn't have hard requirements for range (my work commute was and is incredibly short) so as long as I could get to local stores and back I was happy.

Donor

I searched around for small convertibles such as Mazda Miatas, Fiat Spiders, and MG Migets. Something I noticed is starting from the 1980s to present day cars got very heavy very fast. Typical 1980s cars may be in the mid-upper 2000 lbs, 1990s cars in the 3000 lbs, and then the more modern cars were in the upper 3000 lbs! An example of the weight progression: a 1990s Miata is 2070 lbs, an early 2000s Miata is 2348 lbs, and a more modern Miata is 2500 lbs.

I took a look at a few cars, but the winner by far was the Trimph Spitfire. The car is VERY light (1900ish lbs). The entire hood tilts up so you have outstanding access to the motor bay. Even replacing the brake master cylinder is just a few easy to reach bolts. The car is very simple - no power steering or power brakes (it doesn't need them). But more importantly that means I don't need to maintain a separate pump system to support those. The Spitfire I bought had been garage kept in Phoenix, Arizona - the only rust worth mentioning was at the battery compartment. The car pseudo-ran, but carburetors that are left alone don't have the best reputation for starting back up, so we towed it to my place (I was living just outside of Phoenix at the time).


Spitfire Pre-Conversion (with old convertible top)

I've spoken with a couple people that had Spitfires growing up; apparently you needed 3 of them to keep 1 running. That's probably why they designed the hood to completely fold up and out of the way, the car needed to be worked on all the time! (Don't worry, all my new electrical components bypass the infamous Lucas electrical system.)

I highly recommend reading this very entertaining "Best of Craigslist Ad" for a Triumph Spitfire: http://www.craigslist.org/about/best/aus/990076336.html An excerpt from the ad trying to convince your wife you should be able to buy it: "you've upped your life insurance to a cool $1 million dollars and this car doesn't have air bags & sits at the height of a big rig's lug nuts."

Batteries

Several years ago people primarily used Lead Acid batteries for their conversions. Not because they were the best battery chemistry, but they were unfortunately one of the few options that had availability and affordability for the amateur. However, LiFePO4 (Lithium Iron Phosphate) batteries started to come on the market as it was approaching time for me to buy my batteries. The batteries Tesla uses are Lithium Ion which have superior energy density and are a great fit for production vehicles. However, LiFePO4s are definitely the amateur converters battery of choice. They don't have quite the energy density of Lithium Ion, but they are far more stable (safer for amateurs) and far more affordable. Thankfully now there are many U.S. LiFePO4 suppliers you can order from. (Unlike when I purchased them and had to wait for them to cross the ocean and go through customs!)

Front 20x LiFePO4 Batteries

I have had 1 LiFePO4 go bad which I've replaced recently (the single blue cell you see above), but my pack is turning 6 years old so a single bad cell isn't too surprising.

Motor

Also up until the past few years, DC motor systems were the choice for conversions - relatively cheap and simple. AC motors/controllers are more expensive but they're more efficient and reverse / regenerative braking is trivial for them to do. (Also a DC motor controller can fail in the closed position - meaning run away car. AC motors are safer in that regard.) There were several options and suppliers for buying DC motors and controllers for me at the time, but that wasn't the case for AC systems. Now the selection of AC systems are better. Since my donor was so light (and I was using LiFePO4 batteries), I was able to get away with a smaller 6.7" DC motor and still have great performance.

Side View of Motor


Motor Exposed with Above Control Plate Removed

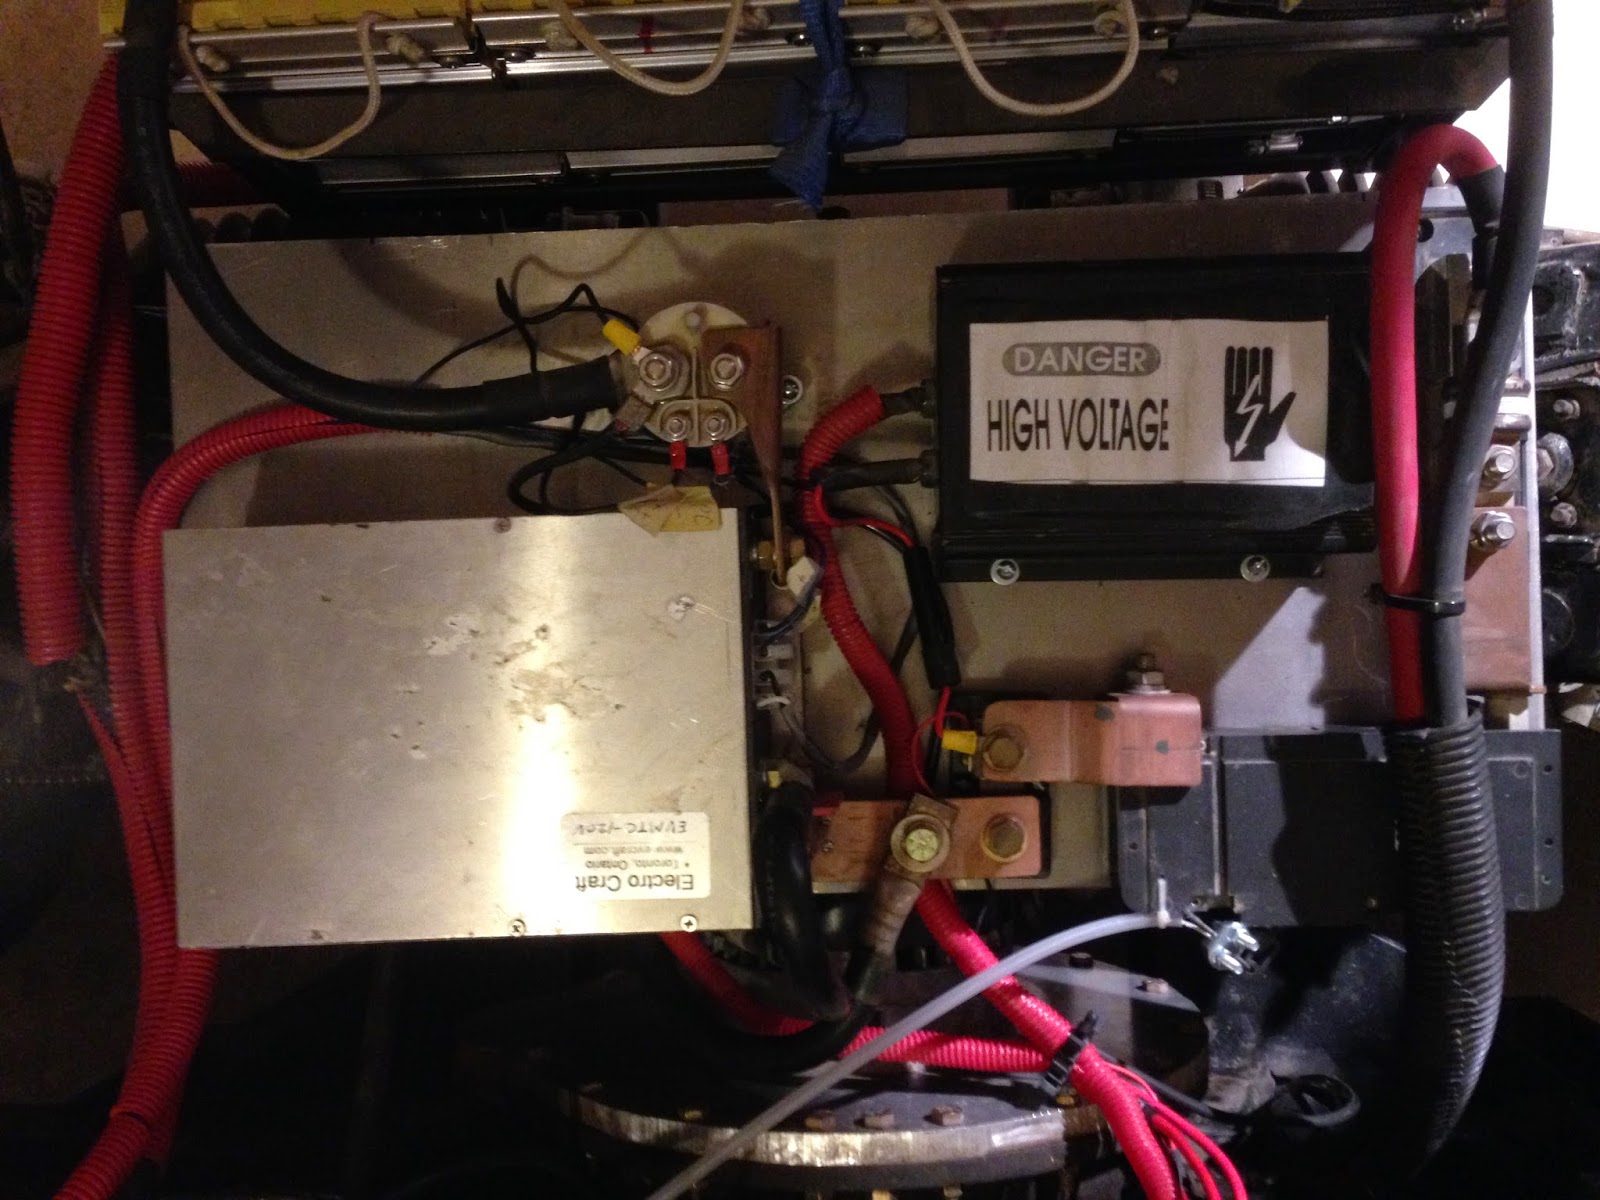
Control Plate

The Control Plate going counterclockwise from top: Contactor (controlled by the key), 500A Motor Controller (to vary the power going to the motor, controlled by foot pedal), Ammeter Shunt (for gauge on dashboard), Circuit Breaker (with safety handle at the driver's seat for emergency shutoff), Fuse, and DC-DC Converter (converts 96V main pack to 12V for car's components).

Control Plate Under Hood

Major Components

ADC L91-4003 Electric Motor
Electrocraft 500A Motor Controller
30x 100AHr LiFePO4 cells in series for 96V nominal

Performance

About 20 miles at highway speeds (50 mph). About 30 miles at city speeds (30 mph). Since I removed the clutch (but kept the transmission), I pretty much throw the car in 2nd gear and do all my driving in that. That gives me plenty of acceleration (probably better than stock) and a good driving speed of 35. (At 40 mph I risk over-spinning my DC motor so I try to keep it in mid 30s while in 2nd.) I can clutchless shift into 3rd gear to get in the 50s, but I try to avoid that to limit excess wear/tear on my 1970s transmission. I know the electric motor sounds small, but it provides full torque at 0 rpm; I have to be careful in reverse so as not to chirp the tires!

Complete Build Cost

Donor Car $1500
Seat Covers $43
Sand Paper $4
Chiltons Book $19.87
Touch-Up Paint $28.21
ADC #L91-4003 $995.95
2.5 Gallons Degreaser $14.60
Primer / Paint $25.44
Convertible Top $220
Rivet Tools / Rivets $29.93
Epoxy / Clamps $7.47
Rivets / Clamps $9.70
CV Grease / Oil $14.94
12V Rewiring Parts $44.95
PB-6 Throttle Box $90.75
Volt/Temp Gauges $27.32
Wire Loom $26.51
Printing Adapter Templates $24.30
Primer / Paint / Wire $18.41
Grinder Pad, Blades $10.26
1/2" Aluminum Plate $77.47
24"x18"x1/4" Plexiglass $20.09
Bolts / WD-40 / Drill Bits $33.60
Shoulder Bolts $25.54
8"x8"x1/4" Alum. Plate $20.99
Sealer, Lock Washers $7.51
Ammeter $65.00
Rubber Gasket $4.34
400A Fuse with Holder $80.55
Precharge Resistors $16.71
3/8"x9"x20" Aluminum $39.32
2x Contactors $275.00
Blades / WD-40 / Bolts $17.15
Circuit Breaker/Shunt $207.40
ElectroCraft Controller $947.64
120V DC-Dc Converter $110.00
Power Strip / Sealant $8.39
Clamp $5.00
Metal Rack $9.67
Bolts $7.88
2/0 Cable & Lugs $60.00
Bolts $5.00
Elec. Connectors $30.27
Elec. Connectors $23.00
10 Ga. Wire $5.96
Fuse Block $50.27
Elec. Connectors $9.74
Bolts $5.87
Fuses $4.29
Wheel $32.00
Batteries $3382.50
Propane Torch $16.00
4 Tires Mounted $28.00
Paint/Primer $17.17
Connectors $2.36
Horn $29.30
Battery Shipping $835.22
Fuse/Wire $12.00
Heatsink Silicon $6.45
Fan/Heatsink $24.03
Battery Boxes $126.00
Paint/Primer $21.66
Bolts $11.03
Drill Bit $7.58
Tie-Downs $9.97
Charger $655.00
Cables/Lugs $118.94
TOTAL $10664.47

Lessons Learned / Future Changes

If I could go back in time, I would have tried to keep the clutch. That would have made transitioning to highway speeds easier. In terms of components, I'm pretty happy with all my decisions based on availability at the time. If I were to do it again (or do a major overhaul on my car), I'd switch over to an AC system. Also I'd like to completely remove the transmission - just do a direct drive from the AC motor to my differential.

I've been tempted to swap out my current DC controller with a more powerful one (higher maximum current) - then I could do all my driving in 3rd gear. I would only need the transmission to go into reverse, but there are options for me to wire my DC motor to support reverse. The downside to starting in 3rd gear is that to get decent acceleration I have to pull more current - which is less efficient and puts extra strain on my batteries. As I pull above 3C (3 * the capacitance of my batteries, or 3 * 100 = 300 Amps), the voltage starts to sag and I get diminishing returns. I'm already pulling 200-300Amps to get good acceleration when I start off in 2nd.

Really though, the car is driving great as is now. My differential seal is leaking a bit so I need to get that replaced, but there are far fewer things that can / do go wrong on this car compared to a comparable gas car!