Sunday, May 10, 2015

Electric Car 240V Charger

What happens when you buy an electric car?

You fill up the tank in your gas car so rarely wasps build a nest under the gas cap!


The Ford Focus electric came with a 120V charger that can plug into a standard U.S. outlet, but it takes 20 hours to charge the car from empty. We had a few times in which we couldn't take a second trip in the car because it was still charging; it was time to get a 240V charger.

I decided on the Juicebox Classic 30 Amp:
 - Rather than being hard wired into the house, it plugs into a standard NEMA 14-50 outlet (common among RV parks). You can also use an adapter to plug into typical dryer outlets. That gives me more options on where to charge.
 - The 30 Amp model meets/exceeds the ability of the car's onboard charger (without going overboard).
 - Long charging cable.
 - It's simple!
 - It's cheap!

Some more advanced chargers allow you to set a delay before charging or report to a smart phone app the charging status, but I didn't need any of that. The car itself allows me to set charging times, and I can use the Ford mobile app to check the charging status. There isn't even a power switch on the Juicebox Classic. When you plug the J1772 into your car, charging starts. Unplug, charging stops.

Please note: I am not an electrician. I just did lots of research on the Internet, spoke with a couple electricians, and managed to put something together that passed the city inspection. (And most importantly not burn down my house.) Don't trust anything I say or did!

Thankfully the distribution panel in my garage has plenty of room.


There are 2 hot leads coming into the panel: the thick red/black wire connected to the top left of the panel and the thick black wire connected to the top right of the panel. Each lead is 120V AC. The 2 leads combined supply 240V.

The white wires along the right side of my panel are the neutral. A 120V outlet will use one hot (either one) and the neutral. The Juicebox doesn't need a neutral wire as it doesn't require a 120V source. However I'll be including the neutral in my 14-50R outlet as who knows what it will be used for in the future.

The bare copper wires along the left side of my panel are the ground.

You can see each one of the hot leads is connected to a bus bar with blades that criss-cross down the panel for the circuit breakers to snap into. A 120V circuit breaker will only snap into one of those blades. A 240V circuit breaker will snap into both blades.

Very educational site / video on this: http://www.askmediy.com/install-220-volt-outlet-4-wire-dryer-outlet/

Shopping list:
 - NEMA 14-50 Outlet
 - Outlet Enclosure
 - 2x Romex Connectors
 - 6/3 gauge Romex cable (6 gauge for the 2 hots and neutral; ground slightly thinner)
 - Cover plate
 - 40 Amp 240V Breaker (Although my plug and wire are rated up to 50 Amp, my charger should only be pulling 30 amps.)
Total about $40

I cut away a section of drywall below my panel to install the new outlet.


AFTER SHUTTING OFF POWER TO THE DISTRIBUTION PANEL....
 - Mounted the outlet enclosure into the side of the stud below the panel.
 - Punched out a hole in the bottom of the panel.
 - Fastened the two connectors (one at the new hole in the bottom of the panel and one at the top of the outlet enclosure).
 - Pulled the Romex cable through the enclosure and into the electrical panel.
 - Tightened the two connectors onto the cable.
 - Connected the wires to the 14-50R outlet. It was very easy - there were labels for the two hots, the neutral, and the ground. Just strip back a little bit of insulation and tighten down on the terminal with a screwdriver. Honestly the hardest part was jamming the outlet with those fat 6 gauge wires into the enclosure.
 - Triple checked everything.
 - Connected the wires to the distribution panel. I stripped back the insulation from the wires as necessary to connect the 2 hot wires directly to the circuit breaker and the last 6 gauge wire to the white neutral bar. The bare copper wire connected to the ground bar. (You'll notice I tried to keep things tidy with the wires going along the outside of the panel.)
 - Triple checked everything again.
 - Reattached the drywall.
 - Turned on power to the panel.
 - Triple checked everything yet again. (You've got a multimeter, right?)
 - I was done! (Well I had to wait for the inspector the next day, but I was basically done.)


JuiceBox installation was stupid easy. You attach the mount to your wall (on studs of course) then the box just slides in from above. Plug in the 14-50 cable into your new outlet and it's powered.


Charging from empty is now only 3.5 hours! Multiple long trips in the car in one day are no longer a problem.

Again, I'm not an electrician so don't trust a word I'm saying. Consider me nothing more than another data point on your quest to get a 240V charger installed. :-)

Tuesday, May 5, 2015

Arduino Retro Computer: BASIC Interpreter (Program Mode)

My first step for the BASIC interpreter was to get the "Program Mode" working. To do that I need to know when I'm in program mode, I need be able to switch how key presses are interpreted (OS vs program), I need to know which line number I'm processing, and I need to parse/process lines of code of running programs.

For initial code commands, I want to be able to print, goto, and end out of a running program.

Which will allow me to create the most important first program of all:

10 PRINT "Hello World!"
20 PRINT "..."
30 GOTO 10


Current Memory Address


I added a new variable to the ScreenMode to keep track of my current program memory address. I will execute code sequentially through the memory blocks (unless I reach a goto / similar loop command).

class ScreenModel
{
  .
  .
  int programMemoryAddressCurrent_bytes;

  bool init(byte newIndex)
  {
    .
    .
    programMemoryAddressCurrent_bytes = programMemoryAddressStart_bytes;
  }

Starting / Stopping Program Mode


Functions were created for starting and stopping the program mode. When called they change the operating mode of that particular ScreenModel, and in the case of execute, it resets the memory address to the start of the program.

Since the program mode and the current program memory address are stored in the ScreenModel, each screen can run (or not run) their own program. Multitasking!

  bool startProgram()
  {
    programMemoryAddressCurrent_bytes = programMemoryAddressStart_bytes;

    operatingMode = operatingModeProgram;

    return true;
  }

  bool stopProgram()
  {
    operatingMode = operatingModeOS;
   
    return true;
  }

To begin executing a program, the user will type "run" in OS mode. The submitCommand() of OS mode interprets the "run" and calls startProgram().

  bool submitCommand()
  {
    .
    .
    else if (strcmp(commandFormatted, "run") == 0)
    {
      startProgram();
    }
    .
    .
  }

When the program is running, the operating mode is operatingModeProgram and thus keyboard inputs get funneled to inputKeyboardProgram rather than inputKeyboardOS.

  // Called from the main loop() with the latest keyboard press.
  // Process the key in the OS or currently running program depending
  // on the current mode. 
  void inputKeyboard(char inputKey)
  {
    switch(operatingMode)
    {
      case operatingModeOS:
        inputKeyboardOS(inputKey);
        break;
      case operatingModeProgram:
        inputKeyboardProgram(inputKey);
        break;
    }
    return;
  }

For the user to halt execution of an active program, they can just push the ESC key.

  // Keyboard input intended to be processed by the currently running program.
  void inputKeyboardProgram(char inputKey)
  {
    if (inputKey == PS2_ESC)
    {
      stopProgram();
    }
    return;
  }

Executing Program Code


Within the main loop() function, I loop through all the screens and call their processEvents().

void loop()
{
  .
  .
  for (int screenIndex = 0; screenIndex < numberOfScreens; screenIndex++)
  {
    screen[screenIndex].processEvents();
  }
}

Within the ScreenModel:

  bool processEvents()
  {
    switch(operatingMode)
    {
      case operatingModeOS:
        // No events to do.
        break;
      case operatingModeProgram:
        programExecuteCurrentMemoryAddress();
        break;
    }
    return true;
  }

processEvents() of the ScreenModel calls programExecuteCurrentMemoryAddress() which gets the program memory string and calls parseProgramString to interpret it.

  bool programExecuteCurrentMemoryAddress()
  {
    char programString[sizeOfCommandArray];
    memset(programString, 0, sizeOfCommandArray);
    getProgramMemoryCommandString(programMemoryAddressCurrent_bytes, programString);

    if (programString[0] == 0)
    {
      addOutputLine("-- Program Ended --");
      stopProgram();
      return false;
    }
   
    return parseProgramString(programString);
  }

Interpreting the Code


parseProgramString increments past the line number and blank spaces to get to the actual command. It then goes through a series of string compares to determine what command the user is trying to do and processes it as appropriate.

  bool parseProgramString(char *programString)
  {
    if (strlen(programString)==0)
    {
      addOutputLine("-- Program Ended --");
      stopProgram();
      return false;
    }
   
    // Skip past the line number and blank spaces.
    char *digitIterator;
    for (digitIterator = programString; (isdigit(*digitIterator) || *digitIterator == ' '); ++digitIterator)
    {
      // Digit or space, we'll advance to the next.
    }
    // Reassign programString pointer to digitIterator (which has passed all digits and spaces).
    programString = digitIterator;
   
    // Convert the command of the program string to lowercase.
    for (char *charIterator = programString; *charIterator != '\0' && *charIterator != ' '; ++charIterator)
    {
      *charIterator = tolower(*charIterator);
    }
   
    if (!strncmp(programString, "print \"", 7))
    {
      parseProgramPrint(programString + 7);
    }
    else if (!strcmp(programString, "end"))
    {
      parseProgramEnd();
    }
    else if (!strncmp(programString, "goto ", 5))
    {
      parseProgramGoto(programString + 5);
    }
    else
    {
      char errorString[sizeOfOutputColumnArray];
      snprintf(errorString, sizeOfOutputColumnArray, "Bad statement, line: %i",
               getProgramMemoryLineNumber(programMemoryAddressCurrent_bytes));
      addOutputLine(errorString);
      stopProgram();
    }
   
    return true;
  }

  bool parseProgramPrint(char *printString)
  {
    char *printChar = printString;
    while (*printChar != 0)
    {
      if (*printChar == '"')
      {
        // Found closing quotes.
        // Clear the quote and break out of the while.
        *printChar = 0;
        break;
      }
      printChar++;
    }
    addOutputLine(printString);

    advanceNextProgramMemoryAddress();

    return true;
  }

  bool parseProgramEnd()
  {
    stopProgram();

    return true;
  }

  bool parseProgramGoto(char *gotoString)
  {
    int targetLineNumber = atoi(gotoString);
    if (targetLineNumber > 0)
    {
      int lastAddress_bytes = getLastProgramMemoryAddress(programMemoryAddressStart_bytes);

      int loopAddress_bytes = programMemoryAddressStart_bytes;
      while (loopAddress_bytes <= lastAddress_bytes)
      {
        byte loopCommandLength_bytes = fram.read8(loopAddress_bytes);

        // Check for end of program.    
        if (loopCommandLength_bytes == 0)
        {
          // End of program, failed goto.
          addOutputLine("Goto line does not exist.");
          stopProgram();
          break;
        }

        // Check if we're replacing or inserting at this line.
        int loopLineNumber = getProgramMemoryLineNumber(loopAddress_bytes);
     
        if (targetLineNumber == loopLineNumber)
        {
          // Goto to this memory location.
          programMemoryAddressCurrent_bytes = loopAddress_bytes;
          break;
        }
   
        // Increment to the next data line.
        loopAddress_bytes += 1 + 4 + loopCommandLength_bytes + 1;
      }
     
    }
    else
    {
      // Error parsing goto.
      addOutputLine("Goto line invalid.");
      stopProgram();
      //advanceNextProgramMemoryAddress();
    }
 
    return true;
  }

Most of the program lines will call advanceNextProgramMemoryAddress() so that the programMemoryAddressCurrent can be incremented to the next line of code. Exceptions would be goto, for, and while statements.

  bool advanceNextProgramMemoryAddress()
  {
    byte commandLength_bytes = fram.read8(programMemoryAddressCurrent_bytes);
    if (commandLength_bytes == 0)
    {
      return false;
    }
 
    // Advance to next program address.
    programMemoryAddressCurrent_bytes += 1 + 4 + commandLength_bytes + 1;

    return true;
  }

Seeing it in Action


Gotta start with Hello World!


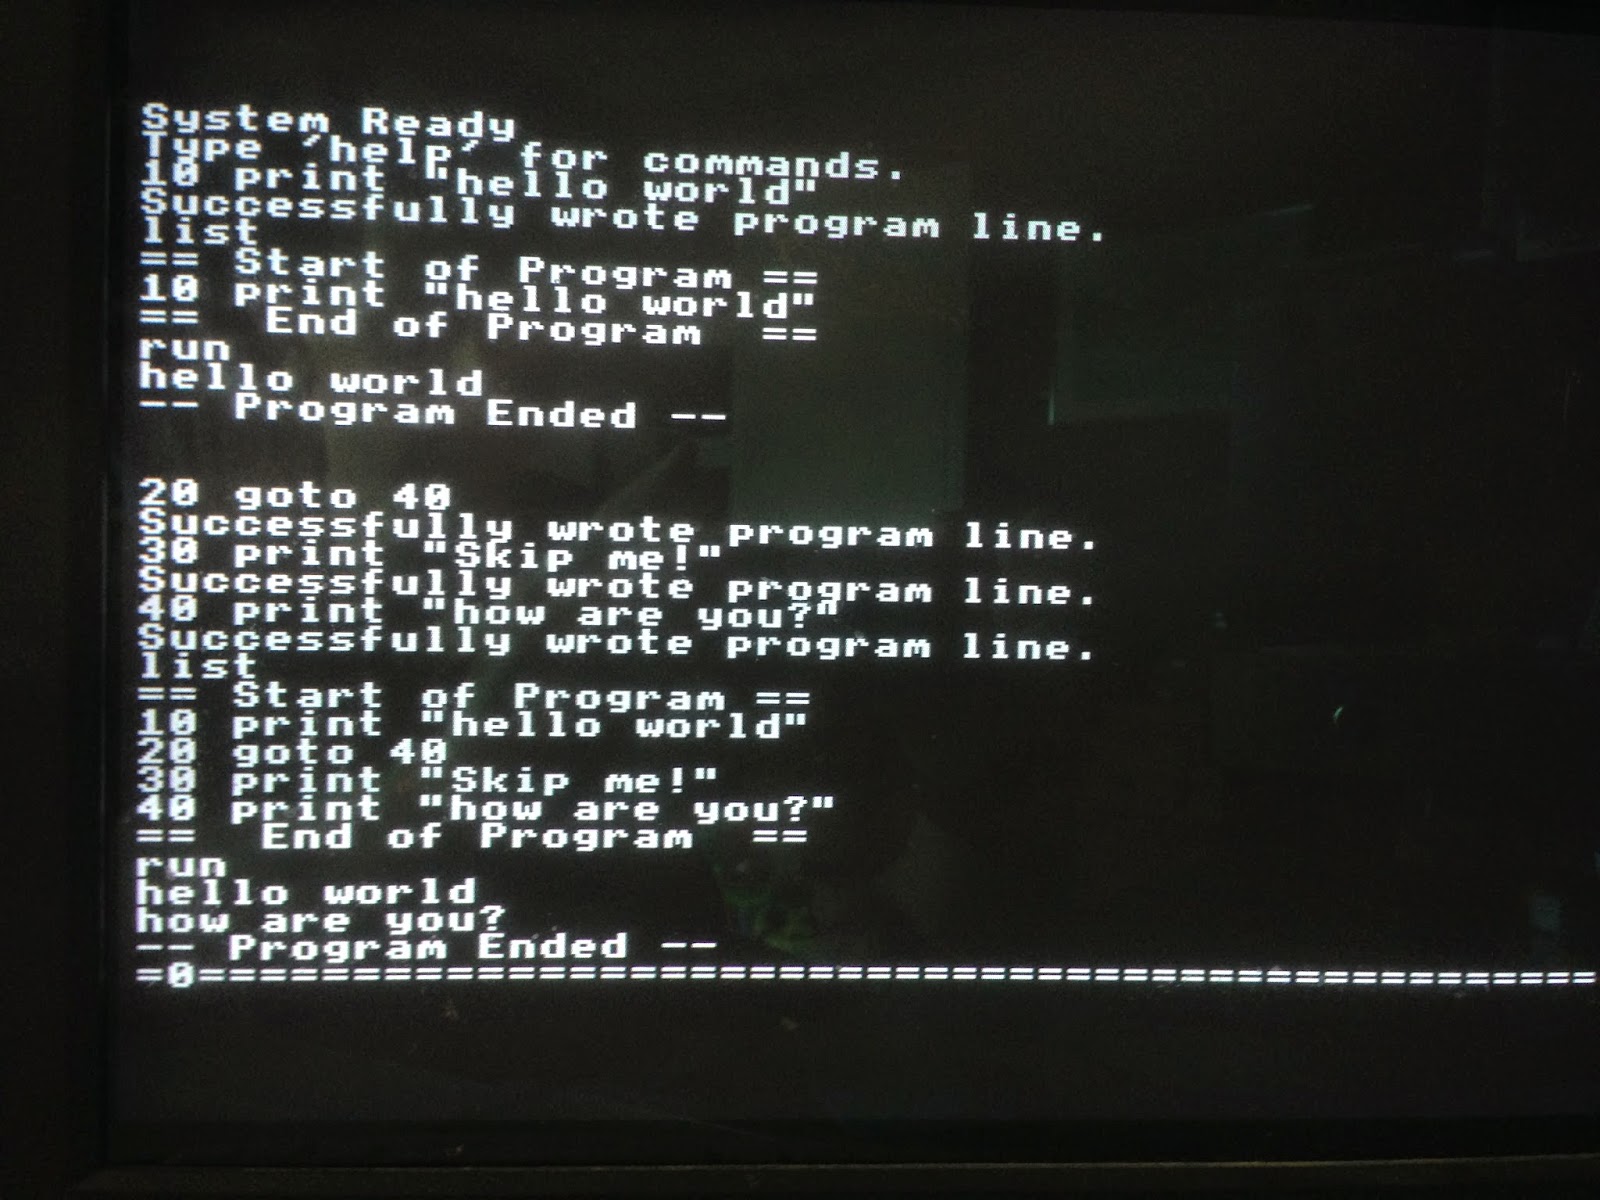
Next is a simple demonstration of the goto command skipping a line of code.


And then using the goto command as a loop.


And finally using the end command to halt execution.


Additional Thoughts


I didn't demonstrate it here, but my Arduino computer is a functioning multitasking operating system. I can run my looping hello world program on one screen and then hit PgUp/PgDown to switch to the other screen to enter OS commands or run other programs.

My screen model has been expanding in functionality quite a bit. Ultimately I'll pull the BASIC interpreter code out of the screen model so it can act as a stand-alone useful class.

I've got a solid start on handling variables inside my BASIC programs. My blogging is lacking a bit behind my actual progress but hopefully an update will come soon.


Copyright (c) 2015 Clinton Kam
Permission is hereby granted, free of charge, to any person obtaining a copy of this software and associated documentation files (the "Software"), to deal in the Software without restriction, including without limitation the rights to use, copy, modify, merge, publish, distribute, sublicense, and/or sell copies of the Software, and to permit persons to whom the Software is furnished to do so, subject to the following conditions:
The above copyright notice and this permission notice shall be included in all copies or substantial portions of the Software.
THE SOFTWARE IS PROVIDED "AS IS", WITHOUT WARRANTY OF ANY KIND, EXPRESS OR IMPLIED, INCLUDING BUT NOT LIMITED TO THE WARRANTIES OF MERCHANTABILITY, FITNESS FOR A PARTICULAR PURPOSE AND NONINFRINGEMENT. IN NO EVENT SHALL THE AUTHORS OR COPYRIGHT HOLDERS BE LIABLE FOR ANY CLAIM, DAMAGES OR OTHER LIABILITY, WHETHER IN AN ACTION OF CONTRACT, TORT OR OTHERWISE, ARISING FROM, OUT OF OR IN CONNECTION WITH THE SOFTWARE OR THE USE OR OTHER DEALINGS IN THE SOFTWARE.

Saturday, April 11, 2015

Arduino Retro Computer: Managing Program Memory (FRAM)

Arduinos have very limited onboard RAM, so for my retro computer I'll be using the FRAM I added in the last post to store the BASIC programs. Managing FRAM isn't difficult, but it's a bit more complex than just defining a big array to manipulate. Below I create a handful of functions to manage the quirks of reading from and writing to FRAM.

The format and functions below are designed for a line number based program memory that you need to traverse forward and back through. However, it could easily be adapted for other types of storage. Please see the Alternate Data Formats section for ideas on how to make a pseudo file system.


Data Format


Programs can have any number of lines and each line can have anywhere from 1 to 100 characters. I don't want to block off the memory in 100 character chunks, because then my maximum program size would only be 320 lines (32,000 / 100). To maximize program size, I include the length of the command alongside the command so I can traverse forward and back with no wasted space.

I formatted the data within the chip as follows:
[Length of Command, 1 Byte, UInt8][Line Number, 4 Bytes, Int32][Command, Up to 100 Bytes, Char Array][Length of Command, 1 Byte, UInt8] .. repeat until length of command = 0..

The [Length of Command] field is so I know how long the current command line is. If the length is 0, then I know this is the end of the program. It's necessary to have the length before and after the data so I can traverse forward and backwards through the memory. An example reason to navigate backwards is to jump to a previous line for a "Goto" command without having to read from the beginning.

The [Line Number] field is an integer of the program's line number. This is purely for performance so that I can quickly parse what the line number is and jump forward or back as necessary. Converting text to an integer then comparing it to another integer is much slower than just comparing two integers.

The [Command] field is the complete command line the user had entered.

An example set of data:
10 PRINT "HELLO WORLD"
20 PRINT "HOW ARE YOU?"

Would be stored in memory as:
[22][10][10 PRINT "HELLO WORLD"][22][23][20][20 PRINT "HOW ARE YOU?"][23][0]


Alternate Data Formats


If you don't need to traverse back through the program memory, then you can leave out the 2nd length byte. That would save one byte per data entry and simplify things a bit.

Even more interesting, if you wanted to use this as a file system you could replace the 4-byte integer with a short string of characters (how about an 8 byte filename + 3 byte extension!).

[Length of File, 2 Bytes, UInt16][File Name + Extension, 11 Bytes, Char Array][File Data, Up to 65535 Bytes (or size of memory)] .. repeat until length of file = 0..

On the plus side, the file system would never be fragmented (the code below doesn't allow wasted space between data, it always condenses it upon each delete or insert). On the downside, it does a lot of extra read/writes to keep the data compressed / defragged. Which is ok for FRAM (fast, lots of writes are ok), but that could be bad for other types of memory.

Setup / Constants


I use the same FRAM chip for all the screens of the Arduino. So at each screen's instantiation, I assign a block of bytes of the FRAM chip for that screen's program memory.

Screen 0 will have memory address 0 through 15999.
Screen 1 will have memory address 16000 through 31999.

const int programMemorySizePerScreen_bytes = 16000;

class ScreenModel
{
  ...
  int programMemoryAddressStart_bytes;
  int programMemoryAddressEnd_bytes;

  bool init(byte newIndex)
  {
    screenIndex = newIndex;

    programMemoryAddressStart_bytes = screenIndex * programMemorySizePerScreen_bytes;
    programMemoryAddressEnd_bytes = programMemoryAddressStart_bytes + programMemorySizePerScreen_bytes - 1;

    ...
  }
  ...
}

Clearing the Program


The Program Memory is stored from programMemoryAddressStart_bytes to programMemoryAddressEnd_bytes. As soon as a command length returns a 0, I consider that the end of the program. If I want to clear a program, it's very easy - just set the first memory address to 0 length.

  bool commandNew()
  {
    programMemoryNew();
    addOutputLine("New program created.");

    return true;
  }

  bool programMemoryNew()
  {
    // Set first memory address to null. It's not necessary to individually
    // clear every line - we won't traverse past a null line.
    fram.write(programMemoryAddressStart_bytes, 0);
    
    return true;
  }


Reading / Writing Line Numbers


I store the line number as a 4-byte integer in the FRAM. Since the FRAM library only writes and reads individual bytes, I have to use bitwise operations to handle the number.

  long getProgramMemoryLineNumber(int memoryAddress_bytes)
  {
    // Get the 4 byte line number from 4 single bytes of the FRAM memory.
    // Take each single byte and offset its position into the corresponding
    // location of the 32 bit integer, then do an OR bitwise operation to
    // combine them into a single number.
    // Please note, Arduino int is only 2 bytes, using long for a 4 byte integer.
    return ((long)fram.read8(memoryAddress_bytes + 4) << 0) |
           ((long)fram.read8(memoryAddress_bytes + 3) << 8) |
           ((long)fram.read8(memoryAddress_bytes + 2) << 16) |
           ((long)fram.read8(memoryAddress_bytes + 1) << 24);
  }
  
  bool setLineNumberToMemory(char *memoryAddress_bytes, long writeLineNumber)
  {
    // Take an 8 bit mask of the 32 bit line number, shift it to the right
    // most 8 bits, then store it in an 8 bit char. Increment the pointer
    // by one byte and repeat until all 4 bytes of the line number have
    // been stored.
    // Please note, Arduino int is only 2 bytes, using long for a 4 byte integer.
    *memoryAddress_bytes = (char)((writeLineNumber & 0xFF000000) >> 24);
    memoryAddress_bytes ++;
    *memoryAddress_bytes = (char)((writeLineNumber & 0xFF0000) >> 16);
    memoryAddress_bytes ++;
    *memoryAddress_bytes = (char)((writeLineNumber & 0xFF00) >> 8);
    memoryAddress_bytes ++;
    *memoryAddress_bytes = (char)((writeLineNumber & 0xFF) >> 0);
    return true;
  }


Memory Manipulation Functions


The following are a variety of supporting function for reading and writing to a memory address.

  int getLastProgramMemoryAddress(int startingAddress_bytes)
  {
    // Find the last program memory address.
    int loopAddress_bytes = startingAddress_bytes;
    while (loopAddress_bytes <= programMemoryAddressEnd_bytes)
    {
      byte loopCommandLength_bytes = fram.read8(loopAddress_bytes);
      
      if (loopCommandLength_bytes == 0)
      {
        // Found the last program memory address.
        break;
      }
      else
      {
        // Increment forward past the command length and supporting variables.
        // 1 Byte, UInt8, Length of Command
        // 4 Bytes, Int32, Line Number
        // # Bytes, Char[], Data
        // 1 Byte, UInt8, Length of Command
        loopAddress_bytes += 1 + 4 + loopCommandLength_bytes + 1;
      }
    }
    return loopAddress_bytes;
  }

  bool programMemoryDeleteData(int deleteAddress_bytes)
  {
    // Get the length of the command.
    int lengthToDelete_bytes = 1 + 4 + fram.read8(deleteAddress_bytes) + 1;

    // Get the last address so we know how much data to shift.
    int lastAddress_bytes = getLastProgramMemoryAddress(deleteAddress_bytes);
    int newLastAddress_bytes = lastAddress_bytes - lengthToDelete_bytes;
    
    // This function shifts memory left (to delete data).
    // Start at the memory address to delete.
    int loopAddress_bytes = deleteAddress_bytes;

    // Loop to the last memory address.
    while (loopAddress_bytes <= newLastAddress_bytes)
    {
      // Copy the data byte then increment to the next address.
      byte dataToCopy = fram.read8(loopAddress_bytes + lengthToDelete_bytes);
      fram.write8(loopAddress_bytes, dataToCopy);
      loopAddress_bytes++;
    }
   
    return true;
  }

  bool programMemoryInsertData(int insertAddress_bytes, char writeData[sizeOfCommandArray+6], int writeDataLength_bytes)
  {
    // This function shifts memory right (for inserting data).
    
    // Start at the last program memory address.
    int lastAddress_bytes = getLastProgramMemoryAddress(insertAddress_bytes);

    for (int loopAddress_bytes = lastAddress_bytes;
             loopAddress_bytes >= insertAddress_bytes;
             loopAddress_bytes --)
    {
      fram.write8((loopAddress_bytes + writeDataLength_bytes), fram.read8(loopAddress_bytes));
    }
    
    // Insert the new data.
    for (int copyOffset_bytes = 0;
             copyOffset_bytes < writeDataLength_bytes;
             copyOffset_bytes ++)
    {
      fram.write8((insertAddress_bytes + copyOffset_bytes), writeData[copyOffset_bytes]);
    }
    
    // Terminate the program.
    fram.write8(lastAddress_bytes + writeDataLength_bytes, 0);

    return true;
  }

  int getProgramMemoryCommandString(int memoryAddress_bytes, char *memoryString)
  {
      byte commandLength_bytes = fram.read8(memoryAddress_bytes);
      memoryAddress_bytes += 1 + 4; // Skip over command length and line number field.
      for (int loopAddress_bytes = memoryAddress_bytes; loopAddress_bytes < memoryAddress_bytes + commandLength_bytes; loopAddress_bytes++)
      {
        // Copy the memory at this address into the memoryString.
        *memoryString = (char)fram.read8(loopAddress_bytes);
        // Then increment our memoryString pointer to the next memory block.
        memoryString++;
      }
      return commandLength_bytes;
  }

Editing a Program Line


If the user enters only a line number, then I interpret that as deleting the line. If the user enters any data after the line number, then I'll create a new line with that data. If the line already exists, I'll replace the existing line with the new one.

  bool commandEditProgramLine(char *commandString)
  {
    int lineNumber = atoi(commandString);
    if (lineNumber > 0)
    {
      // Get the string representation of that number.
      char lineNumberString[11];
      itoa(lineNumber, lineNumberString, 10);
      
      // If the commandString only contains the line number, then let's delete that line.
      if (strcmp(lineNumberString, commandString) == 0)
      {
        // Deleting a program line.
        if (programMemoryDeleteLine(lineNumber))
        {
          addOutputLine("Successfully deleted program line.");
        }
        else
        {
          addOutputLine("Error deleting program line.");
        }
      }
      else 
      {
        // Writing / editing a program line.
        if (programMemoryWriteLine(lineNumber, commandString, strlen(commandString)))
        {
          addOutputLine("Successfully wrote program line.");
        }
        else
        {
          addOutputLine("Error writing program line.");
        }
      }
    }
    else
    {
      addOutputLine("Invalid line number.");
    }
    
    return true;
  }

  bool programMemoryWriteLine(int writeLineNumber, char commandData[sizeOfCommandArray], int commandDataLength_bytes)
  {
    // 1 Byte, UInt8, Length of Command
    // 4 Bytes, Int32, Line Number
    // # Bytes, Char[], Data
    // 1 Byte, UInt8, Length of Command

    int lastAddress_bytes = getLastProgramMemoryAddress(programMemoryAddressStart_bytes);
    
    int loopAddress_bytes = programMemoryAddressStart_bytes;
    while (loopAddress_bytes <= lastAddress_bytes)
    {
      byte loopCommandLength_bytes = fram.read8(loopAddress_bytes);

      // Check for end of program.      
      if (loopCommandLength_bytes == 0)
      {
        // End of program, write data here.
        break;
      }

      // Check if we're replacing or inserting at this line.
      int loopLineNumber = getProgramMemoryLineNumber(loopAddress_bytes);
      
      if (writeLineNumber == loopLineNumber)
      {
        // Overwrite the current line.
        programMemoryDeleteData(loopAddress_bytes);
        break;
      }
      else if (writeLineNumber < loopLineNumber)
      {
        // Insert write line here.
        break;
      }
      
      // Increment to the next data line.
      loopAddress_bytes += 1 + 4 + loopCommandLength_bytes + 1;
    }
    
    // Valid address to write to, insert now.
    char writeData[sizeOfCommandArray+6];
    writeData[0] = commandDataLength_bytes;
    // writeData[1] through writeData[4] will have the line number.
    setLineNumberToMemory(&writeData[1], writeLineNumber);
    memcpy(&writeData[5], commandData, commandDataLength_bytes);
    writeData[5 + commandDataLength_bytes] = commandDataLength_bytes;
    int writeDataLength_bytes = commandDataLength_bytes + 6;
    programMemoryInsertData(loopAddress_bytes, writeData, writeDataLength_bytes);
    
    return true;
  }

  bool programMemoryDeleteLine(int deleteLineNumber)
  {
    int lastAddress_bytes = getLastProgramMemoryAddress(programMemoryAddressStart_bytes);
    
    int loopAddress_bytes = programMemoryAddressStart_bytes;
    while (loopAddress_bytes <= lastAddress_bytes)
    {
      byte loopCommandLength_bytes = fram.read8(loopAddress_bytes);

      // Check for end of program.      
      if (loopCommandLength_bytes == 0)
      {
        // End of program.
        break;
      }

      // Check if we're deleting this line.
      int lineNumber = getProgramMemoryLineNumber(loopAddress_bytes);
      if (deleteLineNumber == lineNumber)
      {
        // Delete this line.
        programMemoryDeleteData(loopAddress_bytes);
        break;
      }

      // Increment to the next data line.
      loopAddress_bytes += 1 + 4 + loopCommandLength_bytes + 1;
    } // loopAddress_bytes <= lastAddress_bytes
    return true;
  }


Listing the Contents of a Program


The commandList() function traverses the entire program to print each line of code to the screen. Ultimately I'll also have it so users can give a range of line numbers to display.

  bool commandList()
  {
    addOutputLine("== Start of Program ==");
    int lastAddress_bytes = getLastProgramMemoryAddress(programMemoryAddressStart_bytes);
    
    int loopAddress_bytes = programMemoryAddressStart_bytes;
    while (loopAddress_bytes <= lastAddress_bytes)
    {
      byte loopCommandLength_bytes = fram.read8(loopAddress_bytes);

      // Check for end of program.      
      if (loopCommandLength_bytes == 0)
      {
        // End of program.
        break;
      }

      char loopCommandString[sizeOfCommandArray];
      memset(loopCommandString, 0, sizeOfCommandArray);
      getProgramMemoryCommandString(loopAddress_bytes, loopCommandString);
      
      // The command array is up to 100 characters (2 lines x 50 characters per line).
      // We have to split up the output into two separate output lines if the user exceeds
      // the size of one line (50 characters). 
      for (int cursorIndex = 0; cursorIndex < loopCommandLength_bytes; cursorIndex += numberOfScreenColumns)
      {
        char commandLineOutput[sizeOfOutputColumnArray];
        memset(commandLineOutput, 0, sizeOfOutputColumnArray); // Ensure null terminated.
        // On the first loop through, copy the first 50 characters (numberOfScreenColumns).
        // If our cursor position exceeds 50 characters (numberOfScreenColumns), then
        // we'll loop through a second time to copy the remaining 50 characeters.
        memcpy(commandLineOutput, &loopCommandString[cursorIndex], numberOfScreenColumns);
        addOutputLine(commandLineOutput);
      } // cursorIndex
      
      // Increment to the next data line.
      loopAddress_bytes += 1 + 4 + loopCommandLength_bytes + 1;
    } // loopAddress_bytes <= lastAddress_bytes

    addOutputLine("==  End of Program  ==");
    return true;
  }

Commands Added to OS


The following if conditions were added to the submitCommand() function to parse the commands:

    else if (strcmp(commandFormatted, "new") == 0)
    {
      commandNew();
    }
    else if (strcmp(commandFormatted, "list") == 0)
    {
      commandList();
    }
    else if (isdigit(commandFormatted[0]))
    {
      commandEditProgramLine(commandFormatted);
    }

If the first character of the command entered begins with a number, then I interpret that as a user editing that program line.

We're approaching a fairly useful computer. Two must-have items remaining: a BASIC interpreter and case to protect everything.


Copyright (c) 2015 Clinton Kam
Permission is hereby granted, free of charge, to any person obtaining a copy of this software and associated documentation files (the "Software"), to deal in the Software without restriction, including without limitation the rights to use, copy, modify, merge, publish, distribute, sublicense, and/or sell copies of the Software, and to permit persons to whom the Software is furnished to do so, subject to the following conditions:
The above copyright notice and this permission notice shall be included in all copies or substantial portions of the Software.
THE SOFTWARE IS PROVIDED "AS IS", WITHOUT WARRANTY OF ANY KIND, EXPRESS OR IMPLIED, INCLUDING BUT NOT LIMITED TO THE WARRANTIES OF MERCHANTABILITY, FITNESS FOR A PARTICULAR PURPOSE AND NONINFRINGEMENT. IN NO EVENT SHALL THE AUTHORS OR COPYRIGHT HOLDERS BE LIABLE FOR ANY CLAIM, DAMAGES OR OTHER LIABILITY, WHETHER IN AN ACTION OF CONTRACT, TORT OR OTHERWISE, ARISING FROM, OUT OF OR IN CONNECTION WITH THE SOFTWARE OR THE USE OR OTHER DEALINGS IN THE SOFTWARE.

Friday, March 13, 2015

2013 Ford Focus Electric

As you could tell from my very first post, I'm really into electric cars. I enjoy doing basic mechanical work on my own cars (oil changes, spark plugs, etc), but it's even better if the car doesn't ever need it!

The Spitfire is a fun good-weather car to cruise with the top down to the local store. It's however not practical for a commute. I've been looking at production electric vehicles for years, but they're either too costly for me or too difficult to find. The Nissan Leaf is probably the best notable exception, and my wife and I did take one for a test drive. I don't want to convince anyone to not buy that car, but for us it lacked a little too much in space, power, and looks appeal. In terms of electric cars it is a solid option if you can't afford a Model S.

I searched for the Ford Focus Electric on and off for years but could never find one for sale anywhere in the state of Texas. That is, until this past week. A Ford dealership in Austin had a 2013 Focus Electric for sale, so the wife and I tried it out. It looks good, has just enough room for our monster stroller in the back, and feels good on power. We bought it.


I tried to find detailed numbers on range (and how it varies based on A/C, driving conditions, etc), but I didn't have any luck. So I'll do it here! I've only had the car for a week, but I'll update the numbers here as I get more experience with the car.

From what I can tell, the car's reported maximum range takes into account driving history (aggressiveness) and climate control. Ford advertises a range of 76 miles. When I picked the car up from the dealership the driving history showed quite a few lead foots had been test driving it. That's understandable as test drivers want to see what the car can do (including myself). At the dealership, even fully charged, the car only reported 63 miles. It wasn't until I drove the car for an hour to clear off that aggressive driving history that the range finally reported >70.

Range Statistics


All of the following data points are from my very initial experience with the car. I'll refine / expand them more as I get more time with it.

The car reports the driving history on a scale of 0 to 6 (Wh/mi x 100):
Coasting - 0
Level 65 MPH - 3
Heavy acceleration - 6

Rules of thumb from full charge:
- Climate control reduces range 12 miles
- Fairly aggressive driving reduces range 12 miles

Since Ford says 76 miles, that's about a 15% reduction on range for either condition. Those are additive - turn on your A/C and drive aggressively and there goes more than a quarter of your range. I haven't figured out the climate control yet. Having the A/C on doesn't automatically cut the range; it's heavily dependent upon the temperature you set inside the car. (Also I've had the A/C blowing cold air without any drop in range, but other times I've seen significant drops.) More experimentation will have to be done.

So some data points to help others interested in the car... (I bet these numbers would apply well to the Leaf / similar electric vehicles.)

Outside temperature cool (50 F to 60 F).
Interstate Highway Driving.
Light on the pedals.
Power consumption history averaging about 3.
No climate control.
Range: 63 to 74 miles

Outside temperature cool (60 F).
Country Highways.
Fairly aggressive driving.
Power consumption history averaging between 3 and 6.
With climate control set to 67 F.
Range: 57 to 59 miles

Outside temperature cool (60 F).
Mostly Interstate Highway, some lower speeds.
Light on the pedals.
Power consumption history averaging just under 3.
No climate control.
Range: 72 to 81 miles

Outside temperature warm (75 F).
Mostly Interstate Highway.
Light on the pedals.
Climate control on (A/C blowing cold air).
Range: 80 miles
(While driving, the range did make a sudden drop of several miles. I assume that was caused by the climate control.)

Outside temperature cold (32 F).
Country Highways / Interstate.
Climate control off.
Range: 60 to 65 miles

Outside temperature cold (32 F).
Country Highways / Interstate.
Heater on.
Range: 42 to 46 miles

Highest reported range: 83 miles
!! UPDATE in August 2016 !!
Highest reported range: 95 miles (Prior trip involved a lot of stop and go driving in heavy traffic.)
!! UPDATE in January 2017 !!
Lowest reported range: 42 miles (Freezing temperatures and heater on.)

I feel the car has a reliable 60 miles range - that's the maximum distance I would plan a trip for that didn't have charging along the way. That 60 miles includes highway driving with gentle hills, easy on the accelerator, and limited climate control.

How accurate is the range?


I've seen the car's estimated range from a full charge to be anywhere from 57 to 81 miles. So how accurate was it?

I've noticed the initial / full-charge range it gives is heavily dependent upon the driving history (maybe the last hour of history).

I've had a full charge report 64 miles, made a long trip, recharged, then had it report 74 miles.

Similarly, I've had a full charge report 74 miles, made a long trip, recharged, then had it report 64 miles.

So is it accurate? It seems to be if you're driving similar conditions to your previous trip.

What about when you're almost out of power? Does it suddenly drop from 5 miles range to 0? When we test drove the car, it only had 6 miles range on it. We made a 5-6 mile test drive and pulled back into the dealership with either 0 or 1 mile range remaining. So I'd say the range is accurate even at very lower values.

When you're driving, the car reports 3 distances: Range, Budget, and Status

At the start of the trip, both range and budget are identical; status is 0. The budget miles decrement based on actual distance traveled. The range miles vary based on your battery charge remaining, climate control settings, and driving history (Wh/mi). The status is just the difference between the budget and range.

Positive status mean you're doing better than your budget (good job!). Negative status mean you're doing worse than your budget (uh oh!). If you had planned a trip that really pushed to the limit of your range and you start seeing negative status, then you know you need to make adjustments (slower driving, turn off climate control, etc).

If your current drive is exactly like your previous drive (accelerations/braking, hills, cruising speeds, etc all the same), then budget generally equals range (status stays near 0). Taking climate control out of this, I've seen the status on drives easily range from +8 to -8!

Cost of Electricity


My electric costs $0.0962/kWh. The car's battery holds 23 kWh of charge. Rough calculation of $0.0962 x 23 = $2.21 to "fill up".

Two big assumptions with that cost:
- As least for LiFePO4 batteries, you don't want to discharge them beyond 80%. I wouldn't be surprised if Lithium-Ion can do better, but I still doubt Ford allows the batteries to discharge to 0%. (Meaning even if the car reports 0% battery, I really only need to charge 18.4 kWh, not 23 kWh, to reach 100%.)
- There are going to be losses with the charger; I just don't know how bad they are.

So if we assume a typical daily drive of 40 miles; that is a rough cost of $2. It will be interesting to see the next electric bill - will it only be up $60?

!!! UPDATE !!!
I got my electric bill! I purchased the car within a day of my billing cycle so the difference between the bills is a good indication of the effect of the car.
March bill: $163.83
April bill: $129.08
So even with doing the majority of driving with the electric car, the bill went down! Apparently electricity for the car is minor compared to the air conditioner / heater.

Summary


At this point we are VERY happy with the car. It's not for everyone, but it could be for a lot of people. I'd say it's contingent on the following conditions:
#1 Have a second gas car to drive for longer trips.
#2 Majority of trips are under 60 miles.
#3 Don't have frequent detours that could push you over 60 miles.
#4 Have a place to charge at home.


Sunday, March 8, 2015

Arduino Retro Computer: Program Memory (FRAM)

Arduinos have a very limited amount of internal RAM. Between the code for my video output, sound output, joystick input, keyboard input, and BASIC interpreter, I am running out of memory for the user's programs. FRAM is this very nice memory I found on Adafruit's website. It is very fast, non-volatile (does not lose memory when unpowered), and comes in large enough sizes for decent sized BASIC programs.

Adafruit has 2 types of interfaces for their FRAMs: I2C and SPI. I went with I2C to make it easy to expand the computer with additional FRAM chips if I want to in the future.

https://learn.adafruit.com/adafruit-i2c-fram-breakout?view=all

I soldered leads onto the FRAM chip.


I'm connecting pins as follows:
FRAM SDA to Arduino SDA (Digital Pin 20)
FRAM SCL to Arduino SCL (Digital Pin 21)
FRAM VCC to Arduino 5V
FRAM GND to Arudino GND
Uses I2C address 0x50 - Default

FRAM A0/A1/A2 control the I2C address so you can have multiples connected at once.


(I know my little computer is turning into a mess of wires; I'll work on a case for it soon.)

The FRAM library is available via the Adafruit website, I included it in my OS sketch:

// FRAM Library
#include <Wire.h>
#include <Adafruit_FRAM_I2C.h>

However at compile time it threw an error of not being able to find Wire.


It turns out my version of the Arduino IDE (1.0.5) is so old it didn't contain new standard libraries that the FRAM uses. I downloaded / installed the new IDE (1.6.0), but then I got a different error:
'prog_ucar' has not been declared


A type definition that Gameduino was using was deprecated and removed in the latest IDE.

To solve this problem, I modified my Gameduino library's GD.h file; at the top I added:

typedef const unsigned char prog_uchar;


Now that the upgrade errors have been resolved, I was able to create a global FRAM object:

Adafruit_FRAM_I2C fram = Adafruit_FRAM_I2C();

Initialize the object in setup():

void setup()
{
  ...
  fram.begin();
  ...
}

And finally make a simple test to make sure it was reading and writing.

  fram.write8(0, 'a');
  fram.write8(1, 'b');
  fram.write8(2, 'c');
  char test0 = (char)fram.readu(0);
  char test1 = (char)fram.readu(1);
  char test2 = (char)fram.readu(2);
  Serial.print(test1);
  Serial.print(test0);
  Serial.print(test2);

The output was "bac", perfect!

That's all for now. Up next for the computer will either be a case or the start of the BASIC interpreter. The interpreter will store the user's BASIC code into the FRAM so I can keep the Arduino's SRAM available for operating system expansion.

Thursday, February 26, 2015

Arduino Retro Computer: Video Output

A little overdue, but I'm now going to cover how I handle the output to a monitor. I'm piggybacking off the ScreenModel described in the "Command Input" post; I recommend reviewing that code to get a more complete picture.

Quick recap - the ScreenModel class contains a display buffer, command buffer, and functions to interact between the two. Multiple screens are defined that the user can switch between by using PageUp and PageDown. To do this, I have a character array defined in the ScreenModel that holds the contents of the entire screen. When you switch between screens if flips between which buffer is drawn.

Output Window

Window Divider

Command Window


I'm using a Gameduino and its GD library for the interface to an external monitor. It should be fairly easy to port this code to another display interface by just replacing a handful of Gameduino specific library calls (and possibly adjusting a few of the constants for number of rows/columns).


Initializing the Gameduino


Pretty simple initialization for the Gameduino, include the library headers and a few commands in the setup() function.

// Gameduinio Library
#include <SPI.h>
#include <GD.h>

void setup()
{
  GD.begin();
  GD.ascii();
  GD.fill(0, ' ', 4096);

  ...
}


Define Constants for the Screen


These constants work well with the Gameduino, but they may require adjusting for different graphics displays.

const int numberOfScreenRows = 37;
const int numberOfScreenColumns = 50;
const int numberOfCommandRows = 2;
const int numberOfOutputRows = numberOfScreenRows - numberOfCommandRows - 1;
const int sizeOfOutputColumnArray = numberOfOutputColumns + 1; // Include null terminator.


ScreenModel Class


Similar to the command input, the bulk of the logic resides in the ScreenModel class. Again rather than pasting it all as one big block, I'm going to look at functions individually. All of the remaining code belongs in the ScreenModel class defined here:

class ScreenModel
{
  public:

  char outputArray[numberOfOutputRows][sizeOfOutputColumnArray];
  char blankLine[sizeOfOutputColumnArray];
  byte screenIndex;

  .. A whole bunch of additional functions described below ..
};


ScreenModel Init


The ScreenModel init assigns the screen index and clears the input and output buffers so they'll be ready for use. I'm also defining a blankLine that is used as a template for empty output (I must explicitly draw the spaces so it clears them off the screen).

So the user isn't completely thrown to the wolves, I give a small hint to type "help"! The addOutputLine function is the go-to function for me to write to the screen and let the ScreenModel handle updating the screen buffers and redrawing the screen.

Between the output and input is a divider line of "="s with the current screen index.

  bool init(byte newIndex)
  {
    screenIndex = newIndex;

    // Define the blank line.
    memset(blankLine, ' ', sizeOfOutputColumnArray - 1);
    blankLine[sizeOfOutputColumnArray - 1] = 0;
    
    clearOutput();
    clearCommand();
    
    addOutputLine("System Ready");
    addOutputLine("Type 'help' for commands.");

    drawWindowDivider();
    redrawCommandWindow();

  .. A whole bunch of other initializing function calls ..
  }


Clearing Output


The clearOutput() function handles everything necessary to clear the output of a given screen. It's currently only called on init(), but I see adding a new a "CLS" or similar command that will also clear the output.

  bool clearOutput()
  {
    // Assign the blank line to every output line.
    for (int rowLoop = 0; rowLoop < numberOfOutputRows; rowLoop++)
    {
      strcpy(outputArray[rowLoop], blankLine);
    }

    // Force a window refresh.
    redrawOutputWindow();
    
    return true;
  }


Switching Screens


Pressing the PageUp or PageDown key switches the active screen. After the activeScreen pointer is switched, a call is made to activeScreen->switchToScreen(). This function forces the output and input windows to be redrawn. The command divider must also be redrawn so it shows the correct screen index.

  void switchToScreen()
  {
    // need to redraw command window when switching screens
    redrawOutputWindow();
    drawWindowDivider();
    redrawCommandWindow();
    return;
  }
  
  bool redrawOutputWindow()
  {
    for (int rowLoop = 0; rowLoop < numberOfOutputRows; rowLoop++)
    {
      GD.putstr(0, rowLoop, outputArray[rowLoop]);
    }

    return true;
  }
  
  bool drawWindowDivider()
  {
    char indexString[12];
    itoa(screenIndex, indexString, 10);

    // Draw a divider line.
    char dividerLine[sizeOfOutputColumnArray];
    memset(dividerLine, '=', sizeOfOutputColumnArray - 1);
    
    // Null terminate.
    dividerLine[sizeOfOutputColumnArray - 1] = 0;
    
    // Add screen index to near the beginning.
    memcpy(&dividerLine[1], indexString, strlen(indexString));
    
    GD.putstr(0, 34, dividerLine);

    return true;
  }


  bool redrawCommandWindow()

  {
    int startRowCommandWindow = numberOfScreenRows - numberOfCommandRows;
    for (int rowLoop = 0; rowLoop < numberOfCommandRows; rowLoop++)
    {
      char drawString[sizeOfOutputColumnArray];
      memcpy(drawString, &commandArray[rowLoop * numberOfScreenColumns], numberOfScreenColumns);
      drawString[sizeOfOutputColumnArray - 1] = 0;
      GD.putstr(0, startRowCommandWindow + rowLoop, drawString);
    }


    return true;
  }


Displaying Command Line Input


As the user types keys for a command, the following code takes those key presses and displays them in the command window section. The drawCommandCharacter function is called whenever a command key is pressed (addCharacter), a command character is removed (removeCharacter), or the entire command line is cleared (clearCommand). 

What makes the code a bit more complicated is that it supports a multiline command. Also rather than forcing the the entire command window to be redrawn with each key press, I'm only drawing the character that has changed.

  bool drawCommandCharacter(int charPosition, char commandChar)
  {
    int drawPositionRow = numberOfScreenRows - numberOfCommandRows;
    int drawPositionColumn = charPosition;

    while (drawPositionColumn >= numberOfScreenColumns)
    {
      // Command array wraps to next line.
      drawPositionColumn -= numberOfScreenColumns;
      drawPositionRow ++;
    }

    char commandString[2];
    commandString[0] = commandChar;
    commandString[1] = 0;
    GD.putstr(drawPositionColumn, drawPositionRow, commandString);
    return true;
  }


Displaying Program Output


Last but not least is the code to actually output to the screen.

  bool addOutputLine(char *outputLineString)
  {
    // Move all existing lines up one.
    for (int rowLoop = 1; rowLoop < numberOfOutputRows; rowLoop++)
    {
      memcpy(outputArray[rowLoop-1], outputArray[rowLoop], sizeOfOutputColumnArray);
    }

    // Get the output length (limited to the width of the screen).
    int outputLength = strlen(outputLineString);
    if (outputLength >= sizeOfOutputColumnArray)
    {
      outputLength = sizeOfOutputColumnArray - 1;
    }
    
    // Take a blank line with null termination. Copy the output string to
    // the blank line, but don't include the output line's null termination!
    // That way we maintain the trailing empty spaces of the blank line.
    char outputLine[sizeOfOutputColumnArray];
    strcpy(outputLine, blankLine);
    memcpy(outputLine, outputLineString, outputLength);
    
    // Add new line to the bottom.
    memcpy(outputArray[numberOfOutputRows-1], outputLine, sizeOfOutputColumnArray);
    
    // Force a window refresh.
    redrawOutputWindow();
    
    return true;
  }


Copyright (c) 2015 Clinton Kam
Permission is hereby granted, free of charge, to any person obtaining a copy of this software and associated documentation files (the "Software"), to deal in the Software without restriction, including without limitation the rights to use, copy, modify, merge, publish, distribute, sublicense, and/or sell copies of the Software, and to permit persons to whom the Software is furnished to do so, subject to the following conditions:
The above copyright notice and this permission notice shall be included in all copies or substantial portions of the Software.
THE SOFTWARE IS PROVIDED "AS IS", WITHOUT WARRANTY OF ANY KIND, EXPRESS OR IMPLIED, INCLUDING BUT NOT LIMITED TO THE WARRANTIES OF MERCHANTABILITY, FITNESS FOR A PARTICULAR PURPOSE AND NONINFRINGEMENT. IN NO EVENT SHALL THE AUTHORS OR COPYRIGHT HOLDERS BE LIABLE FOR ANY CLAIM, DAMAGES OR OTHER LIABILITY, WHETHER IN AN ACTION OF CONTRACT, TORT OR OTHERWISE, ARISING FROM, OUT OF OR IN CONNECTION WITH THE SOFTWARE OR THE USE OR OTHER DEALINGS IN THE SOFTWARE.

Tuesday, February 17, 2015

Arduino Retro Computer: Calculator

The most basic function of a computer is to be... a calculator. (For an interesting story, learn about the history of VisiCalc and the Apple 2.)

I have to do calculations for work frequently throughout the day, and I usually have several Windows Calculators up at one time. This retro computer can be perfect for that role.


For my initial implementation, I'm supporting the basic math operators: +, -, *, and /. The user will be able to set the initial value and/or perform those math operations. Each screen of the OS will keep track of its last calculated math operation. That way users can continuously operate on running results. (And if they switch to a different screen, they can have a different running calculation going.)

The following code is a follow-up to the previous post "Arduino Retro Computer: Command Input". I highly recommend reading that post to understand this one better.

The basic premise is if the command string parsed by submitCommand() starts with the character "=", then the command string gets sent to commandMath() for processing.

The following commands are available:
=###   (Set the previousMathResult to the given ###.)
=+###   (Increment the previousMathResult by the given ###.)
=-###   (Decrement the previousMathResult by the given ###.)
=*### (Multiply the previousMathResult by the given ###.)
=/### (Divide the previousMathResult by the given ###.)
=###+### (Add two numbers, store the result in previousMathResult.)
=###-### (Subtract two numbers, store the result in previousMathResult.)
=###*### (Multiply two numbers, store the result in previousMathResult.)
=###/### (Divide two numbers, store the result in previousMathResult.)

Math commands can also be compounded:
=###+###-### (Perform addition followed by subtraction.)


What's Bad / Future Improvements


  • The calculator does not adhere to proper "Operator Precedence". http://en.wikipedia.org/wiki/Order_of_operations Calculations are always performed from the left to the right, regardless of the operation. (And no ability to use parenthesis to denote the order.)
  • More advanced functions such as sin/cos/tan, power, and sqrt aren't (yet) supported.
  • The calculator does not (yet) report hex and binary values. This is important to my work so I'll eventually get that added.
  • Doing =-### subtracts the previous result by ### rather than sets the current value to -###. (It thinks the user wants to perform a subtraction operation rather than set a negative value.)

(I have a strong feeling a "Calculator Part 2" will be posted in the near future.)


Screen Shot


At the start you can see I set the previousMathResult to 5. I then perform several additions on the running value.

I am also able to perform a calculation on 2 numbers regardless of the last result. (2+2=4)


The Code


class ScreenModel
{
  public:
  ..
  double previousMathResult;

  bool init(byte newIndex)
  {
    ..
    previousMathResult = 0.0;
    ..
  }

  bool submitCommand()
  {
    ..
    // Command Formatted is what the user entered with a null terminator.
    // The commandFormatted is incremented by one when it is passed into
    // commandMath so it doesn't have to reparse the leading "=".
    else if (strncmp(commandFormatted, "=", 1) == 0)
    {
      commandMath(commandFormatted+1);
    }
    ..
  }

  double commandMath(char *commandString)
  {
    // Determine the starting number and store in the result variable.
    // If an operator, we'll begin with the result of the previous math calculation.
    double result;
    switch (*commandString)
    {
      case 0:
      case '+':
      case '-':
      case '*':
      case '/':
        // First character is terminator or operator.
        result = previousMathResult;
        break;
      default:
        // Read the starting number. Also advance the commandString pointer
        // to the end of the number / location of the operator.
        result = strtod(commandString, &commandString);
        break;
    }
    
    // Ensure the operator and the next digit are not a terminator.
    while ((*commandString != 0) && (*(commandString+1) != 0))
    {
      // Next character should be the operatot.
      char *operatorChar = commandString;
      // Increment the commandString pointer passed the operator and read the number;
      double number = strtod(++commandString, &commandString);
      switch (*operatorChar)
      {
        case '+':
          result += number;
          break;
        case '-':
          result -= number;
          break;
        case '*':
          result *= number;
          break;
        case '/':
          // Divide by 0 protection.
          if (number != 0.0)
          {
            result /= number;
          }
          break;
        default:
          // Invalid operator - possibly a space. Continue processing to the next
          // character. Even if we have multiple spaces between the numbers and the
          // operators, the while loop will eventually increment the commandString
          // pointer to the next valid operation.
          break;
      }
    }

    // Completed processing the string. Format the result and display!
    char mathString[sizeOfOutputColumnArray];
    // Can't use snprintf - Arduino does not support floats in sprintf.
    //snprintf(mathString, sizeOfOutputColumnArray, "%lf", result);
    dtostrf(result, sizeOfOutputColumnArray-1, 8, mathString);
    addOutputLine(mathString);
    

    previousMathResult = result;
    
    return result;
  }

};


Copyright (c) 2015 Clinton Kam
Permission is hereby granted, free of charge, to any person obtaining a copy of this software and associated documentation files (the "Software"), to deal in the Software without restriction, including without limitation the rights to use, copy, modify, merge, publish, distribute, sublicense, and/or sell copies of the Software, and to permit persons to whom the Software is furnished to do so, subject to the following conditions:
The above copyright notice and this permission notice shall be included in all copies or substantial portions of the Software.
THE SOFTWARE IS PROVIDED "AS IS", WITHOUT WARRANTY OF ANY KIND, EXPRESS OR IMPLIED, INCLUDING BUT NOT LIMITED TO THE WARRANTIES OF MERCHANTABILITY, FITNESS FOR A PARTICULAR PURPOSE AND NONINFRINGEMENT. IN NO EVENT SHALL THE AUTHORS OR COPYRIGHT HOLDERS BE LIABLE FOR ANY CLAIM, DAMAGES OR OTHER LIABILITY, WHETHER IN AN ACTION OF CONTRACT, TORT OR OTHERWISE, ARISING FROM, OUT OF OR IN CONNECTION WITH THE SOFTWARE OR THE USE OR OTHER DEALINGS IN THE SOFTWARE.