Thursday, December 25, 2014

Arduino Retro Computer: Joystick Interface

The joystick itself contains no logic - it's just push buttons and potentiometers. The brains of the input reside in the Arduino.

Some very good references on how to read analog and digital input on the Arduino:

http://arduino.cc/en/Tutorial/ReadAnalogVoltage
http://arduino.cc/en/tutorial/button
http://arduino.cc/en/Reference/Constants

Basically, we can't just wire from 5V through a push button then to the data input pin; we must use a pull-up (or pull-down) resistor. The critical piece for the push buttons from those references is as follows: "If you have your pin configured as an INPUT, and are reading a switch, when the switch is in the open state the input pin will be "floating", resulting in unpredictable results. In order to assure a proper reading when the switch is open, a pull-up or pull-down resistor must be used. The purpose of this resistor is to pull the pin to a known state when the switch is open. A 10 K ohm resistor is usually chosen, as it is a low enough value to reliably prevent a floating input, and at the same time a high enough value to not not draw too much current when the switch is closed."

Hardware

9-Position Female D-Sub Connector (Radio Shack #276-1538)
5x 10k Ohm Resistor
Breadboard

Wiring

The wiring for the select button is different than the 4 push buttons. The Joystick Breakout Board shorts Select (S1) to GND when the stick is pressed in. To read this, Select is wired with a pull-up resistor while the others are with pull-down.

Wiring Schematic:

Created with http://www.digikey.com/schemeit

The pin layout for the serial cable is as follows:

#1 S1 (Stick Select Button)
#2 S2 (Right Button)
#3 S3 (Top Button)
#4 S4 (Left Button)
#5 S5 (Bottom Button)
#6 Vcc
#7 Analog Xout
#8 Analog Yout
#9 GND


Code

I created a Joystick Class in my operating system code to ease in interfacing:
class JoystickModel
{
  private:
  int buttonPinSelect;
  int buttonPinRight;
  int buttonPinTop;
  int buttonPinLeft;
  int buttonPinBottom;
  int analogPinX;
  int analogPinY;

  public:
  bool init(int newButtonPinSelect, int newButtonPinRight, int newButtonPinTop, int newButtonPinLeft, int newButtonPinBottom,
            int newAnalogPinX, int newAnalogPinY)
  {
    buttonPinSelect = newButtonPinSelect;
    buttonPinRight = newButtonPinRight;
    buttonPinTop = newButtonPinTop;
    buttonPinLeft = newButtonPinLeft;
    buttonPinBottom = newButtonPinBottom;
    
    pinMode(buttonPinSelect, INPUT);
    pinMode(buttonPinRight, INPUT);
    pinMode(buttonPinTop, INPUT);
    pinMode(buttonPinLeft, INPUT);
    pinMode(buttonPinBottom, INPUT);

    analogPinX = newAnalogPinX;
    analogPinY = newAnalogPinY;
       
    return true;
  }
  
  bool selectPressed()
  {
    // Returns true if button is pressed.
    // Select button uses LOW because the joystick breakout shorts to ground with select.
    return (digitalRead(buttonPinSelect) == LOW);
  }
  
  bool leftPressed()
  {
    // Returns true if button is pressed.
    return (digitalRead(buttonPinLeft) == HIGH);
  }
  
  bool topPressed()
  {
    // Returns true if button is pressed.
    return (digitalRead(buttonPinTop) == HIGH);
  }
  
  bool rightPressed()
  {
    // Returns true if button is pressed.
    return (digitalRead(buttonPinRight) == HIGH);
  }
  
  bool bottomPressed()
  {
    // Returns true if button is pressed.
    return (digitalRead(buttonPinBottom) == HIGH);
  }
  
  float analogX()
  {
    // Returns position of stick between -1 and 1.
    // Take - as X potentiometer is mounted reversed on controller.
    return -(((float)analogRead(analogPinX) / 512.0) - 1.0);
  }
  
  float analogY()
  {
    // Returns position of stick between -1 and 1.
    // Take - as Y potentiometer is mounted reversed on controller.
    return -(((float)analogRead(analogPinY) / 512.0) - 1.0);
  }
};

Global:
const int Joystick1SelectPin = 3;
const int Joystick1RightPin = 4;
const int Joystick1TopPin = 5;
const int Joystick1LeftPin = 6;
const int Joystick1BottomPin = 7;
const int Joystick1AnalogX = 0;
const int Joystick1AnalogY = 1;

const byte numberOfJoysticks = 2;
JoystickModel joysticks[numberOfJoysticks];

Inside setup():
  joysticks[0].init(Joystick1SelectPin, Joystick1RightPin, Joystick1TopPin, 
                    Joystick1LeftPin, Joystick1BottomPin, Joystick1AnalogX, Joystick1AnalogY);

Inside loop():
  float analogX = joysticks[0].analogX();
  float analogY = joysticks[0].analogY();
  char analogXString[10];
  char analogYString[10];
  dtostrf(analogX, 5, 3, analogXString);
  dtostrf(analogY, 5, 3, analogYString);
  Serial.print("Analog X: ");
  Serial.print(analogXString);
  Serial.print(" Analog Y: ");
  Serial.print(analogYString);

  if (joysticks[0].selectPressed())
  {
    Serial.print(" Select Pressed");
  }
  if (joysticks[0].rightPressed())
  {
    Serial.print(" Right Pressed");
  }
  if (joysticks[0].topPressed())
  {
    Serial.print(" Top Pressed");
  }
  if (joysticks[0].leftPressed())
  {
    Serial.print(" Left Pressed");
  }
  if (joysticks[0].bottomPressed())
  {
    Serial.print(" Bottom Pressed");
  }
  Serial.println("");


Output from the console:


Asteroids + Controller


I wanted to play the Asteroids game with my new controller, so I made the following changes to the game code to get it to work:

Replaced controller_init() with:
static void controller_init()
{
  // Configure input pins with internal pullups
  pinMode(6, INPUT);
  pinMode(7, INPUT);
}

Replaced controller_sense() with:
static byte controller_sense(uint16_t clock)
{
  byte r = 0;
  if (digitalRead(6))
  {
    r |= CONTROL_UP;
  }
  if (digitalRead(7))
  {
    r |= CONTROL_DOWN;
  }
  return r;
}

In static void handle_player(byte i, byte state, uint16_t clock), there is a line:
    char rotate = (512 - analogRead(0)) / 400;
Since my stick is reversed, I just had to make that negative:
    char rotate = -(512 - analogRead(0)) / 400;


Copyright (c) 2015 Clinton Kam
Permission is hereby granted, free of charge, to any person obtaining a copy of this software and associated documentation files (the "Software"), to deal in the Software without restriction, including without limitation the rights to use, copy, modify, merge, publish, distribute, sublicense, and/or sell copies of the Software, and to permit persons to whom the Software is furnished to do so, subject to the following conditions:
The above copyright notice and this permission notice shall be included in all copies or substantial portions of the Software.
THE SOFTWARE IS PROVIDED "AS IS", WITHOUT WARRANTY OF ANY KIND, EXPRESS OR IMPLIED, INCLUDING BUT NOT LIMITED TO THE WARRANTIES OF MERCHANTABILITY, FITNESS FOR A PARTICULAR PURPOSE AND NONINFRINGEMENT. IN NO EVENT SHALL THE AUTHORS OR COPYRIGHT HOLDERS BE LIABLE FOR ANY CLAIM, DAMAGES OR OTHER LIABILITY, WHETHER IN AN ACTION OF CONTRACT, TORT OR OTHERWISE, ARISING FROM, OUT OF OR IN CONNECTION WITH THE SOFTWARE OR THE USE OR OTHER DEALINGS IN THE SOFTWARE.

Saturday, December 20, 2014

Arduino Retro Computer: Joystick Construction

Common in the older connect-to-your-television computers were joysticks. After all, those computers were really for playing games (yes, they were advertised as "educational" or for "work", but my TI-99/4A has built in joystick ports for a reason). The Asteroids game included in the Gameduino definitely convinced me I needed joysticks. Yes I could retrofit a classic Nintendo controller, or... I could build one from scratch.

Hardware:

Dual Printed Circuit Board (Radio Shack #276-148)
Round Tact Buttons (Adafruit #1009)
Joystick Breakout Board (Adafruit #512)
9-Position Male D-Sub Connector (Radio Shack #276-1537)
6' Serial Cable (Radio Shack #26-1402)
#4-40 x 3/8" Bolts
#4-40 x 1/2" Bolts
#6 Washers

Creating the Case:

I used Sketch Up to create a case. The case includes extruded mounts for the two boards and an opening for the serial connector:


The lid for the case:


The extrusions at the 4 corners of the lid are so it doesn't have any play room to rotate or slide around the case. The extrusion in the middle is so I can put a set screw to secure the lid onto the case. It is opposite of the serial cable connection.

I used Repetier / Slic3r to create the G-code of my case:


3 hours 4 minutes later I had my printed case!


Well, one more hour for the lid.


(There are all sorts of tips and tricks out there on how to get the first layer to stick to the print surface. I've found double sided tape to work very well. It's cheap and it easily comes off the finished part.)

I basically had to monitor the print for the entire 4 hours, someone is very interested in the printer...


Wiring:

The brains of the joystick will be with the Arduino. The joystick itself is basically just a collection of buttons and potentiometers wired to a serial cable.

Wiring Schematic:


The pin layout for the serial cable is as follows:

#1 S1 (Stick Select Button)
#2 S2 (Right Button)
#3 S3 (Top Button)
#4 S4 (Left Button)
#5 S5 (Bottom Button)
#6 Vcc
#7 Analog Xout
#8 Analog Yout
#9 GND

I wired the Vcc from the D-Sub connector to the button board - then I jumped the Vcc from the button board to the analog stick board. This helped keep the wire area around the connector clean and simple. Photo of the back so that makes sense...


In the photo above you can see the Vcc long bare wire that makes connections across all the buttons.

The final product!

Lid off:


Lid on:


I was expecting to needs nuts for the mounting bolts, so I designed the case with the holes going all the way through. However I've found the #4 bolts fit snugly in the 1/8" diameter holes and no nuts were necessary. I did need a few washers for the bolts on the analog stick board as the 3/8" length bolts were too long and would protrude out (I suppose I could have found shorter bolts or dremeled the bolts in half, but washers were easier.)


The bottom turned out nice and flat.

Lessons Learned:

The case came out pretty well, but there are a couple items that could be improved upon:

#1 Probably the most significant change needed is the analog stick. When in the neutral position it looks great, but as the stick tilts you can see behind the analog's cone cover. To prevent that, I need to have the overall case be thicker so I can put the lid higher over the analog stick. With the lid higher, I'd be able to use a smaller hole that closes around the analog stick's cone cover. Then as the stick tilts you wouldn't be able to look inside the case. I'd rather not have the controller be any bulkier though and really that's getting pretty nit-picky. For my purposes it's not a big deal.

#2 I could have gone a bit fancier with how the lid fits onto the case. Maybe cut some gaps in the case that the lid notches / snaps into? I'll think about it. The lid fits a bit tight right now. I need to give the lid's extrusions probably 1/16" or 1/32" clearance from the edges of the case so it fits in better and doesn't try to bow out.

This is just the first joystick; I've purchased enough parts to build a second for multiplayer. I'll give this first one some use and think about more tweaks before I construct the second.

Next up, the joystick wiring at the Arduino!

Saturday, December 13, 2014

Arduino Retro Computer: PS/2 Keyboard

Now that I had a video output, I needed some method of input to the computer. I have an extra PS/2 keyboard, and Adafruit sells a very handy PS/2 Wired Connector (Part #804)!


The wires coming from the PS/2 connector are flexible, so I soldered some rigid pins that can plug into the Arduino's GPIO slots.

Wiring from the PS/2 connector to Arduino Mega:
Black to GND
Green to 5V
Yellow to 2 (PWM, IRQ pin)
Brown to 30 (Digital, Data pin)
White - not used
Red - not used


Next up was the code. The Arduino PS/2 library and more information on connecting a keyboard can be found at: http://playground.arduino.cc/Main/PS2Keyboard

The examples in the library are very good, but here is a code snippet to show how simple it is:

#include <PS2Keyboard.h>

const int DataPin = 30;
const int IRQpin =  2;

PS2Keyboard keyboard;

void setup()
{
  keyboard.begin(DataPin, IRQpin);
  Serial.begin(9600);
}

void loop()
{
  if (keyboard.available())
  {
    char inputKey = keyboard.read();

    if (inputKey == PS2_ENTER)
    {
      Serial.println();
    }
    else if (inputKey == PS2_TAB)
    {
      Serial.print("[Tab]");
    }
    else if (inputKey == PS2_ESC)
    {
      Serial.print("[ESC]");
    }
    else if (inputKey == PS2_LEFTARROW)
    {
      Serial.print("[Left]");
    }
    else if (inputKey == PS2_RIGHTARROW)
    {
      Serial.print("[Right]");
    }
    else if (inputKey == PS2_UPARROW)
    {
      Serial.print("[Up]");
    }
    else if (inputKey == PS2_DOWNARROW)
    {
      Serial.print("[Down]");
    }
    else if (inputKey == PS2_DELETE)
    {
      Serial.print("[Del]");
    }
    else if (inputKey == PS2_PAGEDOWN)
    {
      Serial.print("[PgDn]");
    }
    else if (inputKey == PS2_PAGEUP)
    {
      Serial.print("[PgUp]");
    }
    else if (inputKey >= 32 && inputKey <= 126)
    {
      // Normal characters.
      Serial.print(inputKey);
    }
  }
}

I've been writing an operating system for the Arduino computer that captures those key inputs to do various commands. The OS is a major work in progress, but I will be making postings about it as well.


Arduino Retro Computer: Gameduino


The Gameduino is a shield you can stack on top of the Arduino to get both a VGA monitor and stereo sound output. http://excamera.com/sphinx/gameduino/

Specs of the Gameduino
  • Video output is 400x300 pixels in 512 colors
  • All color processed internally at 15-bit precision
  • Compatible with any standard VGA monitor (800x600 @ 72Hz)
  • Background Graphics
    • 512x512 pixel character background
    • 256 characters, each with independent 4 color palette
    • Pixel-smooth X-Y wraparound scroll
  • Foreground Graphics
    • Each sprite is 16x16 pixels with per-pixel transparency
    • Each sprite can use 256, 16 or 4 colors
    • Four-way rotate and flip
    • 96 sprites per scan-line, 1536 texels per line
    • Pixel-perfect sprite collision detection
  • Audio output is a stereo 12-bit frequency synthesizer
    • 64 independent voices 10-8000 Hz
    • Per-voice sine wave or white noise
    • Sample playback channel
Sounds like the perfect match for my retro computer!

For the features I have planned, I need access to nearly all of the GPIO pins. Also, the Gameduino is designed to sit on top of an Arduino Uno, but the Mega2560 has different locations for its SPI pins. So rather than mount the Gameduino on top of the Arduino, I used jumper wires to connect only the pins that are required.


Jumper connections from Gameduino to Arduino Mega:
Pin 9 to Pin 9 (SS)
Pin 11 to Pin 51 (MOSI)
Pin 12 to Pin 50 (MISO)
Pin 13 to Pin 52 (SCK)
3.3V to 3.3V
5V to 5V
GND to GND

The Gameduino comes with an impressive Asteroids game with great graphics and sound. I temporarily wired up a few buttons to be able to play it. The example Asteroids game really gave me motivation to have gamepad style joysticks connected to the computer. Those are coming soon...


Friday, December 12, 2014

Arduino Retro Computer: Intro


I love the simplicity of vintage '70s / '80s computers. Hook them up to your TV, switch the power on, and you're instantly at a prompt with BASIC ready to go. Want to play a game? Plug in the cartridge, restart, and it loads instantly (well, with ROM based games anyways - definitely not tape). There is no waiting for startup, waiting for shutdown, or worrying about drivers. Of course tablet computers such as the iPad have basically brought this concept back. Well almost - modern tablets throw you in to a bunch of useful programs rather than an ominous "READY" BASIC screen. :-)

Back in 5th grade my teacher would give out points for doing well on assignments that we could spend on certain activities. I don't remember what all we could do with the points; I always used mine to play on the TI 99/4A computer at the back of the classroom. Now, this computer was already obsolete by that time, but it didn't make it any less fun. At the end of the school year the teacher actually gave it to me. (I was probably the only one that used it anyways.) I not only still have that computer; it still works! I've owned several modern computers that didn't even last 3 years, this thing is over 30!


In addition to being interested in these older computers, I've also wanted to get as close to building a useful computer from scratch as possible. There are quite a few crazies out there that have built anywhere from simple calculators to actual 8-bit computers with a breadboard and too many wires to count. http://www.bigmessowires.com/bmow1/ (I mean crazy is a sincere way!)

I've been tempted to try building a computer with one of these older chips, but I'm thinking building one with a more modern ATmega chip would be a bit more useful. An Arduino that boots to BASIC that can access all the GPIOs could lead to some very fast prototyping! I've found a handful of others online that have done similar with their Arduinos, but all of them have severe limitations (display, program size, etc). My goal will be something far more substantial and useful.

It's easy to get overwhelmed or lose interest in a project like this, so my strategy is as follows: Get it up and running as quickly as possible with ready to go components. Then replace those components one by one with my own custom solutions as time and desire permits.

Step 1: Start with a Arduino Mega with a Gameduino shield (for the video/sound output).
Step 2: Code an initial operating system. Use PS/2 keyboard connected to Arduino for input.
Step 3: Add joysticks for game control.
Step 4: Add additional memory for user programs.
Step 5: Code a BASIC interpreter.
Step 6: Add a SD card interface.
Step 7: Replace the Arduino Mega board with the individual components (use a standalone ATmega chip). Basically make it no longer an Arduino, but it will still be semi-Arduino compatible.
Step 8: Replace the Gameduino shield with my own video/sound implementation.
Step 9: Build integrated keyboard / computer case.

I think step #8 will be the most challenging, but that's why it is near the end. I've actually already done steps #1 and #2. I've purchased joystick components for step #3, FRAM for step #4, and a SD card reader for step #6. I've got running ideas for the BASIC interpreter, but I imagine that will be an evolving piece for the entirety of the project. I did see some BASIC interpreters that have been loaded on Arduinos, but I wasn't very happy with them. Not a problem - coding that is a big part of the fun.

Arduino Mega + Gameduino + PS/2 Interface + Button Inputs (Pseudo-Joystick)

At this time the "computer" boots up instantly to a prompt. It only supports a handful of commands now, but a nifty feature I added is the ability to swap between screens. It operates similar to command line Linux where you can change between consoles that are running different programs with a key press. My goal is to be able to run 2+ BASIC programs simultaneously. Each BASIC program is full screen, but you can select which one is visible at any time. This will be multitasking, not multithreading - the Arduino will have to flip back and force between the programs' instructions to execute them - they aren't actually executing simultaneously, but it will still be a neat feature.

The two lines below the = divider are for command input. The 0 in the divider denotes that I'm on screen 0. If I press PAGE UP/DOWN I can switch between different screens.

I have a son now (2 months old!), and I like the idea of my creation here being his first computer. He wants to do something with the computer? Well there is the BASIC prompt, tell it what to do! My poor kid doesn't get the easy route with an iPad playing Angry Birds. (Dean, if you read this some day, sorry? :-) ) My deadline is to make it useful before he outgrows its capabilities! I guess I'm in a rush to add features to delay the inevitable. :-)


This will be one of my long term projects so I'll post updates at major milestones.

Thursday, December 4, 2014

Arduino GPS

UPDATE: Complete source code is now available at:
http://kamoly.space/projects/gps/


Background

My wife and I have been making an annual summer trip to Colorado to get out of the Texas heat. On some of the hikes we get a bit adventurous (and the trails are poorly marked), so I wanted to have a GPS receiver on hand just in case. There are maps, but they're horrible - my wife and I are convinced its Coloradans sick joke to get Texans lost in the mountains. They have so many visitors in Pagosa Springs from Texas, the gas station actually stocks Big Red! Sure there are a wide variety of GPS receivers on the market,  but why buy one of them when I could make my own with an Arduino! (Also I've used some of the other GPS receivers, and their user interfaces are awful.)

This is a project I completed earlier this year, so I don't have good step by step instructions. However, the source code may be very beneficial to you if you're working on your own GPS project.

Hardware for the Project
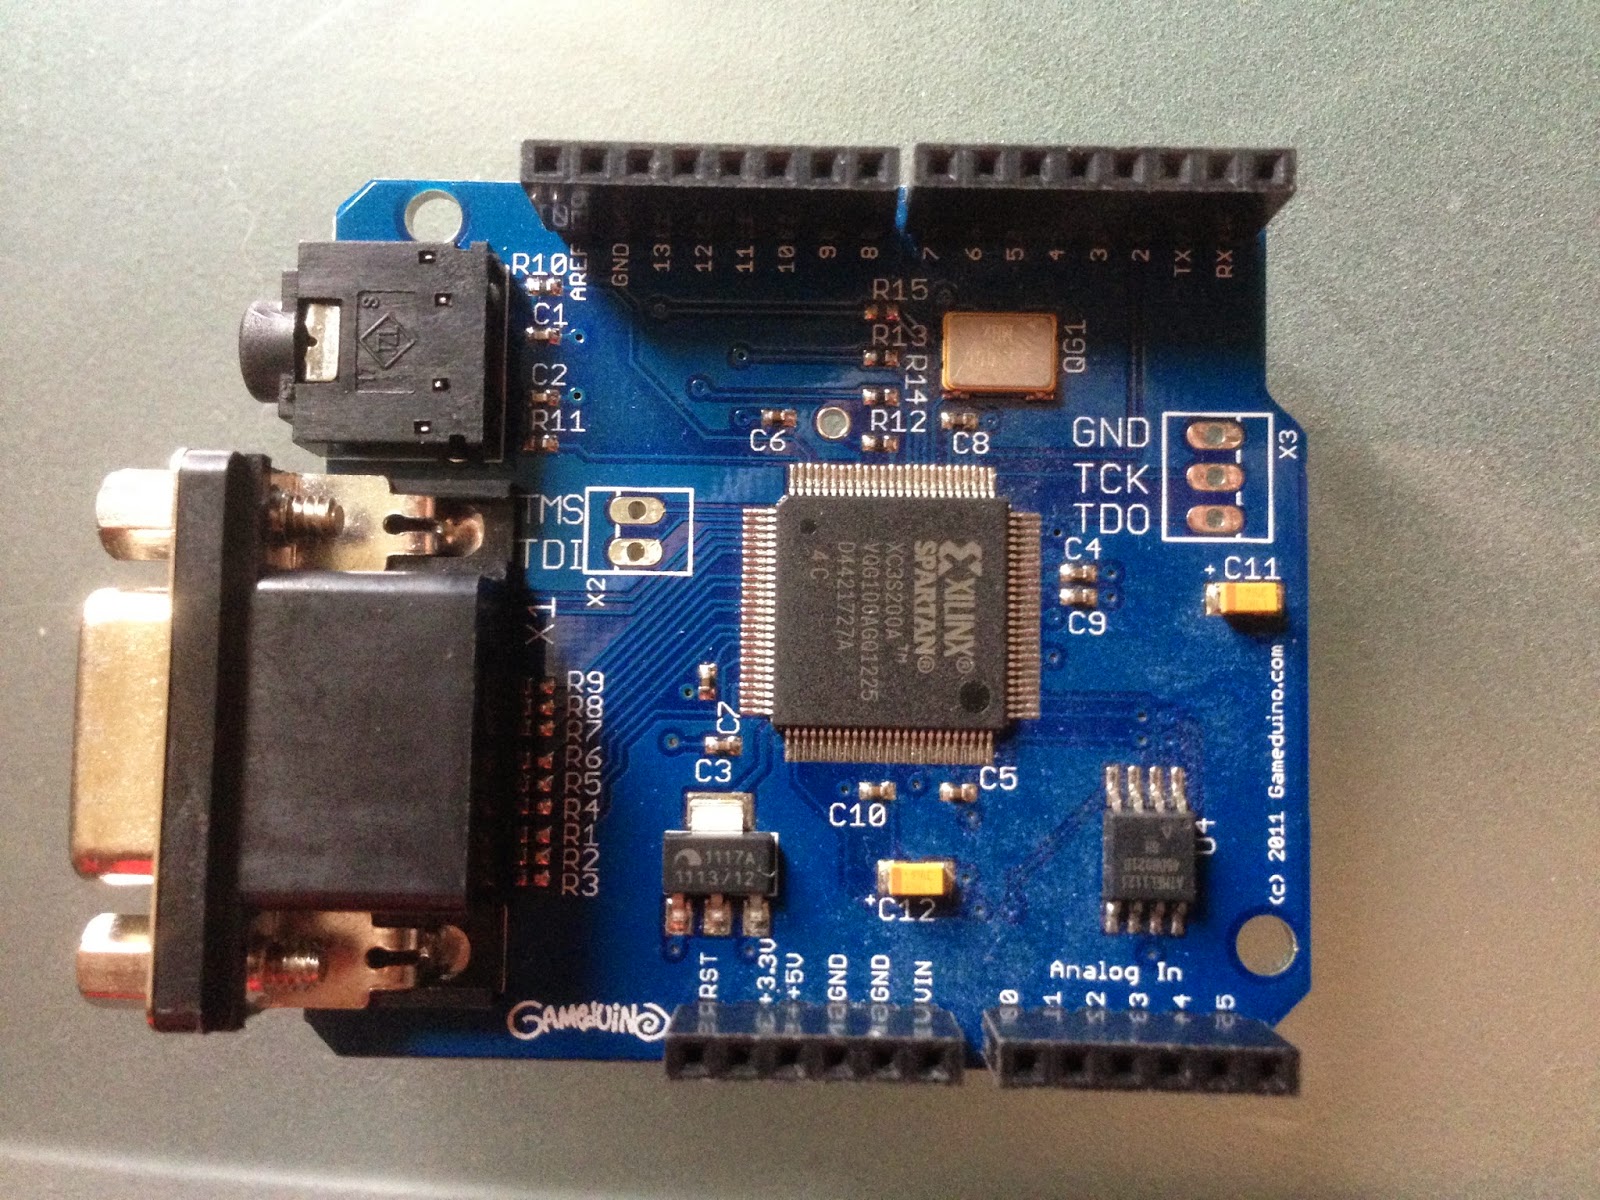
Arduino Mega 2560
Seeedstudio 2.8" TFT Touch Shield (v1.0, but they have newer versions now)
Adafruit Ultimate GPS Breakout
Wire
Prototype Board
Battery Holder
4 AA 1.2V Rechargeable NiMH Batteries
Fiberglass & Epoxy


Design

At a minimum, I wanted to see my current location and be able to log waypoint locations at major turns along the hike. The display should show the total distance back to home (accumulated from the current location through each previous location). Then based on my speed, I could show how much time it will take to get back home. The user interface should allow me to set waypoints, navigate between waypoints, and clear all waypoints.

I haven't done this yet, but long term I'd like to save and load collections of waypoints as routes. I could use the internal EEPROM or add a SD card interface

I'm using the Arduino's USB connection for two purposes: For development, it delivers power and is the communication link with the computer. For portable use, it delivers power from a battery pack.

Build Process

1. Plug the TFT Touch Shield directly into the Arduino.
2. Mount a prototype board over the remaining part of the Arduino. Mount the GPS Breakout to the prototype board.
3. Jump wires soldered from the GPS Breakout to appropriate pins on the Arduino.
4. Write code to display the GPS position and keep track of waypoints.
5. Cut an A/B USB cable in half and strip the wires. Connect red wire to + of battery holder and black wire to - of battery holder. White and green wires are data and are not connected.
6. The Arduino USB connection takes a 5V power input. Use 4x 1.2V NiMH batteries to get 4.8V nominal. It is VERY important to not use 1.5V alkaline batteries - otherwise the pack will deliver 6.0V which is too high for the Arduino.
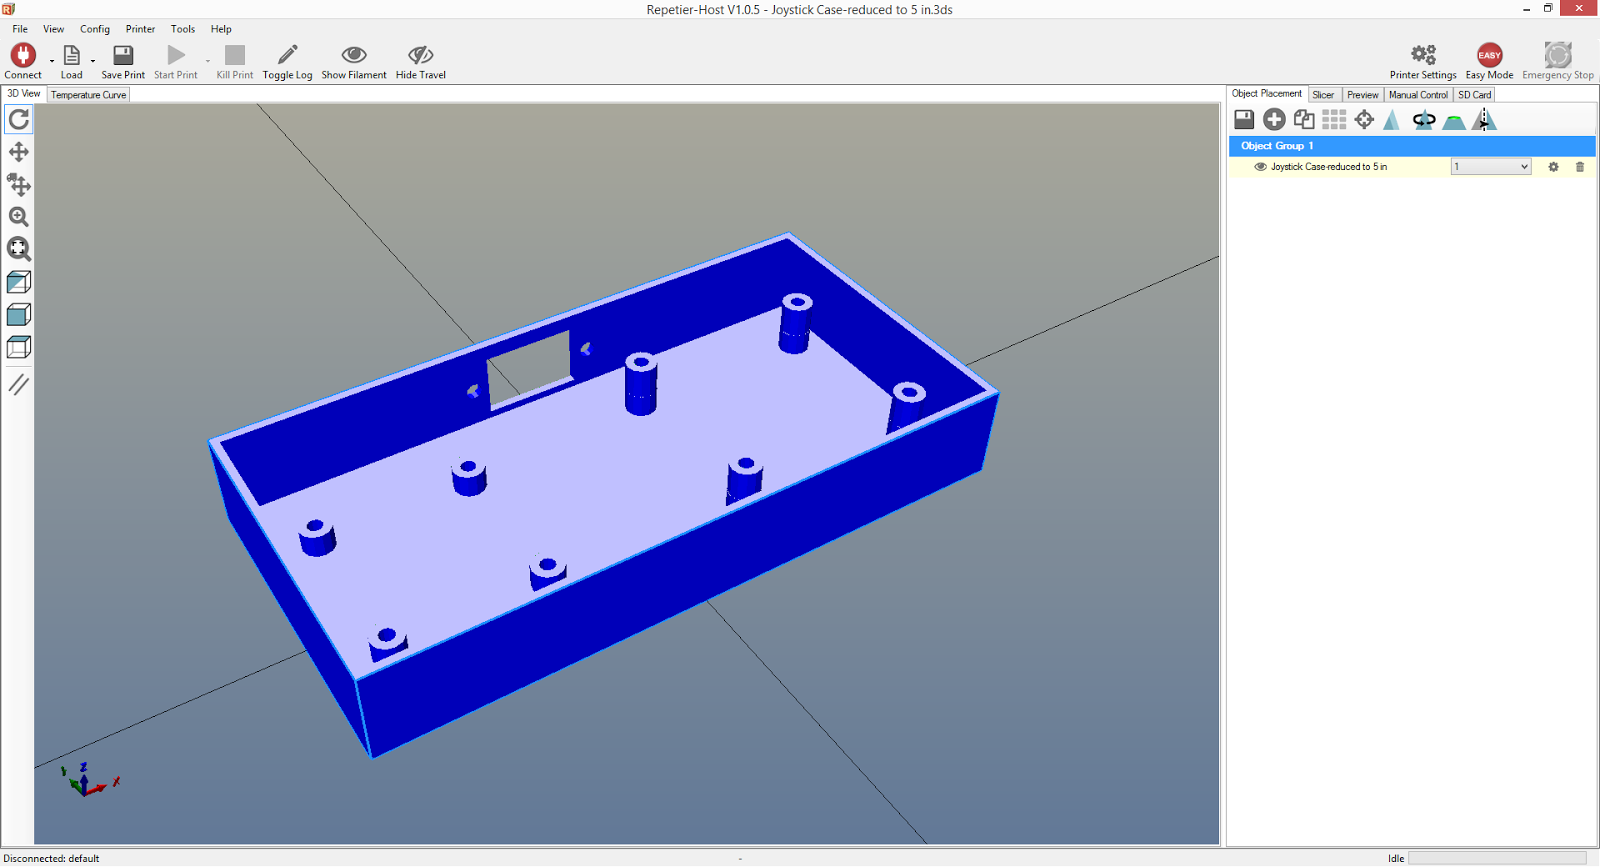
7. Layer several sheets of fiberglass together and epoxy them to make a fairly thick plate. Cut the plate to shape each side of the case then use additional epoxy to hold it all together.

User Interface

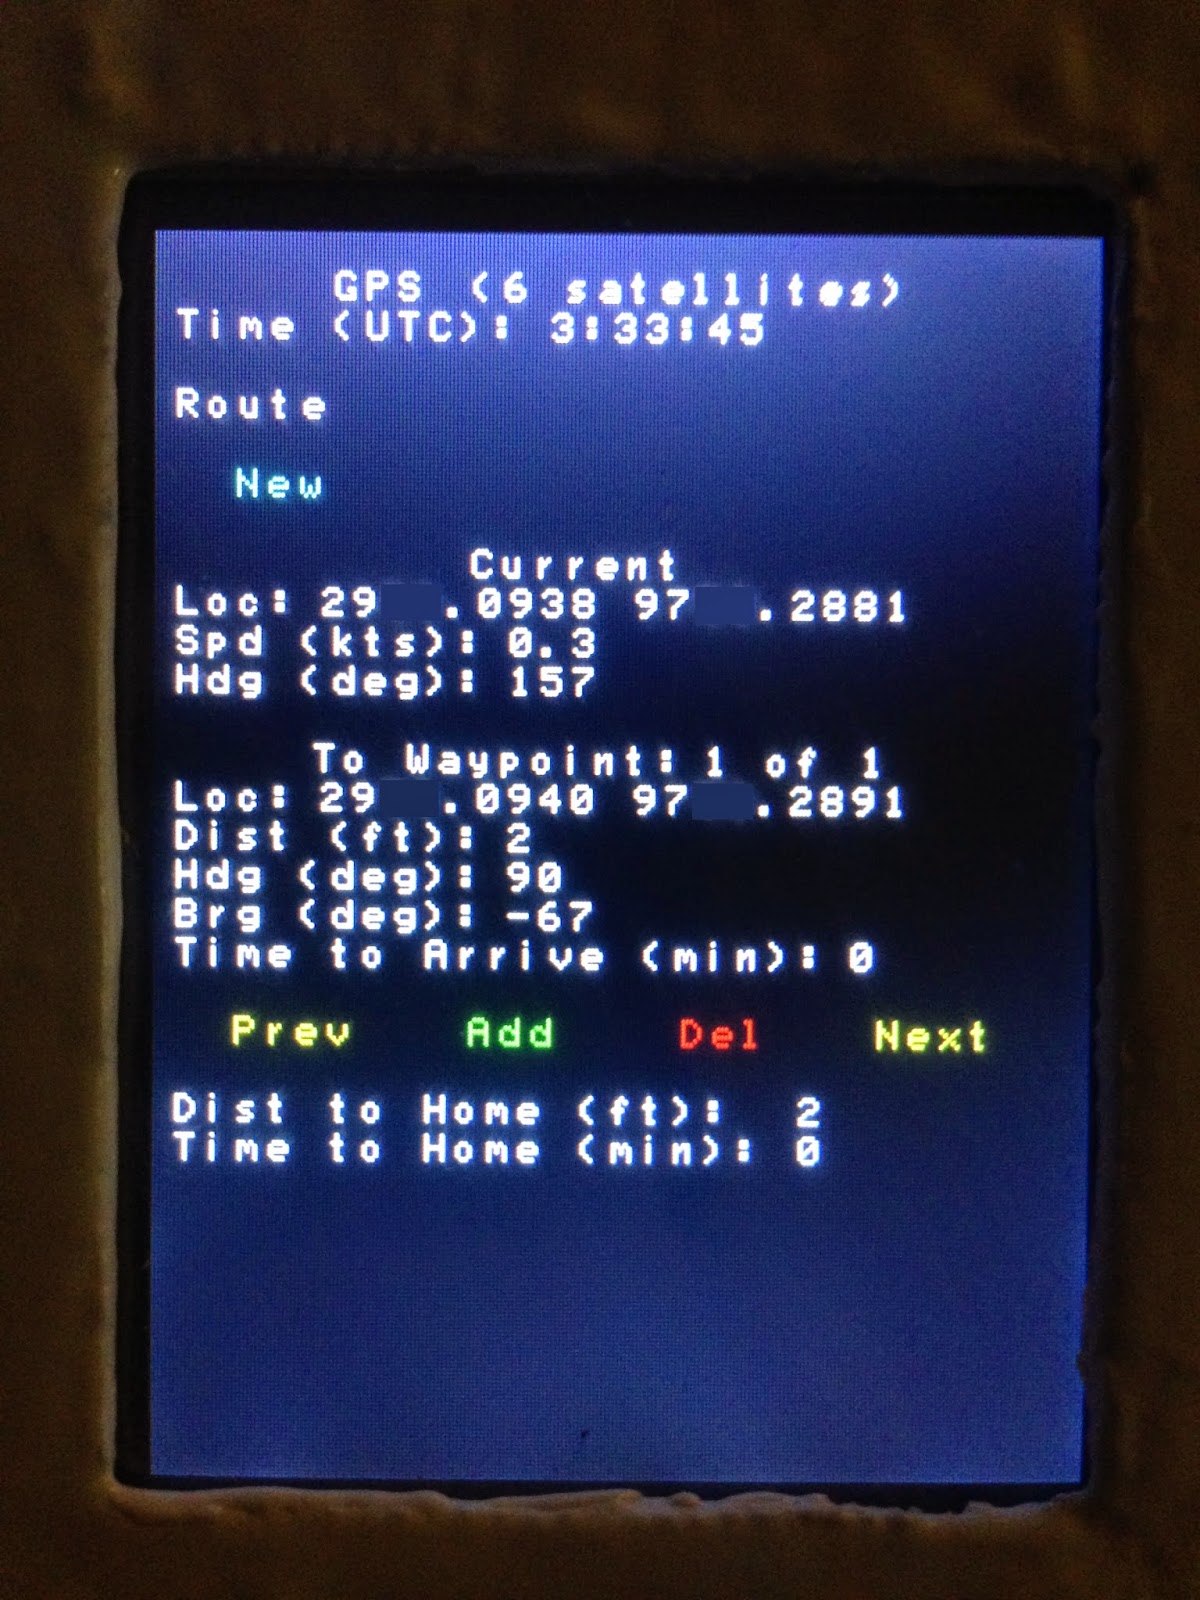
The first block is just for the number of satellites detected and the current time.
The second block is for maintaining the routes. For now it doesn't support saving and loading routes, so the only option is New.
The third block displays the current location, speed, and heading.
The fourth block displays information to the currently selected waypoint.
The fifth block includes options to navigate between waypoints, create new waypoints, and delete existing waypoints.
The sixth block shows the accumulated distance to home and time to home. The distance home is the accumulation from the current position to the currently selected waypoint and through every preceding waypoint. Time home is the the distance home divided by the current speed.
The last block is a confirmation block which asks the user to confirm adding waypoints, deleting waypoints, and creating new routes. The confirmation is important so inadvertent contact with the GPS screen does not cause unwanted actions.

When the GPS starts, it shows the current location.


Pushing the Add button results in a confirmation selection as the bottom of the screen.


If the Add Waypoint is confirmed, a waypoint is added.


Additional waypoints can be added. Pushing Prev and Next cycles between the waypoints. Del deletes the currently selected waypoint.


New clears all waypoints (creates a new Route). The empty space to the right of New is for future expansion for saving and loading routes.

Other Notes

The distances are calculated and displayed using the WGS-84 Round Earth model. The functions below may be very useful for other purposes in which round Earth distances or headings are desired.

If the display is currently on waypoint 3 of 5 and add is selected, then the current location is added as waypoint 4 and the existing waypoints 4 and 5 are shifted to 5 and 6 respectively.

The touch screen takes a while to refresh. I was originally clearing and refreshing the entire screen with each update - it would take a long time (longer than a second). And during the redraw, the user interface would be unresponsive. The code below only clears out and redraws the values that change in normal operation. This allowed me to update the GPS values on the screen far more frequently while making the GPS still responsive to user input.

Lessons Learned / Future Changes

1. The Touch Screen is a bit hard to read in direct sunlight and I'm sure it's drawing a lot of power. Maybe use an e-ink display instead with a different input device?
2. The USB cable for portable power works, but it sticks out quite a bit and it's a little unwieldy getting everything in the backpack (without putting extra stress on the power connection). I may rewire how the battery pack is connected so it doesn't use the USB port.
3. Still need to add code to save / load routes to EEPROM or a SD card.

Source Code

// ClintK
// Adapted from "parsing" GPS example.

// Create / clear new route. Then confirm at bottom.
// Create waypoint. Then confirm at bottom.
// Select which waypoint to go to. Then confirm at bottom.
// Delete waypoint. Then confirm at bottom.
// Cancel button at bottom.

// GPS Headers
#include <Adafruit_GPS.h>
#include <SoftwareSerial.h>

// EEPROM is for reading/writing the onboard Arduino memory.
//#include <EEPROM.h>

// TFT is for manipulating the TFT display.
#include <stdint.h>
#include <TouchScreen.h>
#include <TFT.h>

// GPS Setup
// Connect VIN to +5V
// Connect GND to Ground
// Connect GPS RX (data into GPS) to Digital 0 (or RX1 pin 19)
// Connect GPS TX (data out from GPS) to Digital 1 (or TX1 pin 18)

// Necessary???
SoftwareSerial mySerial(3, 2);

// Using Hardware Serial / Arduino Mega
Adafruit_GPS GPS(&Serial1);

// Set GPSECHO to 'false' to turn off echoing the GPS data to the Serial console
// Set to 'true' if you want to debug and listen to the raw GPS sentences.
#define GPSECHO  false

// this keeps track of whether we're using the interrupt
// off by default!
boolean usingInterrupt = false;
void useInterrupt(boolean); // Func prototype keeps Arduino 0023 happy

// TFT Setup
#define YP A2   // must be an analog pin, use "An" notation!
#define XM A1   // must be an analog pin, use "An" notation!
#define YM 54   // can be a digital pin, this is A0
#define XP 57   // can be a digital pin, this is A3
#define TS_MINX 140
#define TS_MAXX 900
#define TS_MINY 120
#define TS_MAXY 940
// Pin 13 has an LED connected on most Arduino boards.
// give it a name:
int builtInLED = 13;

int selectedScreen = 0;
int selectedConfirmation = 0;

#define EQUATORIAL_RADIUS_IN_NAUTICAL_MILES 3443.918 // Radius of Earth in nm, WGS-84

#define MAX_NUMBER_OF_WAYPOINTS 100

double getRadiansFromDegrees(double value_degrees)
{
  return (value_degrees * 3.1415926535897932384626433832795 / 180.0);
}

double getDecimalDegreesFromDegreeDecimalMinutes(double value_degreeDecimalMinutes)
{
  double shiftedValue = value_degreeDecimalMinutes / 100;
  double wholeDegreeComponent = (int) shiftedValue;
  double fractionalDegreeComponent = (shiftedValue - wholeDegreeComponent) * 100 / 60.0;
  return (wholeDegreeComponent + fractionalDegreeComponent);
}

class WaypointModel
{
  public:
  double latitude_degreeDecimalMinutes;
  double longitude_degreeDecimalMinutes;
  double latitude_decimalDegrees;
  double longitude_decimalDegrees;

  boolean clear()
  {
    latitude_degreeDecimalMinutes = 0.0;
    longitude_degreeDecimalMinutes = 0.0;
    latitude_decimalDegrees = 0.0;
    longitude_decimalDegrees = 0.0;
    return true;
  }

  boolean setLocation(double newLatitude_degreeDecimalMinutes, double newLongitude_degreeDecimalMinutes)
  {
    latitude_degreeDecimalMinutes = newLatitude_degreeDecimalMinutes;
    longitude_degreeDecimalMinutes = newLongitude_degreeDecimalMinutes;
    latitude_decimalDegrees = getDecimalDegreesFromDegreeDecimalMinutes(latitude_degreeDecimalMinutes);
    longitude_decimalDegrees = getDecimalDegreesFromDegreeDecimalMinutes(longitude_degreeDecimalMinutes);
    return true;
  }
};

class RouteModel
{
  public:
  WaypointModel waypoints[MAX_NUMBER_OF_WAYPOINTS];
  int currentWaypoint;
  int totalWaypoints;

  boolean clearRoute()
  {
    for (int waypointIndex = 0; waypointIndex < MAX_NUMBER_OF_WAYPOINTS; waypointIndex++)
    {
      waypoints[waypointIndex].clear();
    }
    currentWaypoint = 0;
    totalWaypoints = 0;
    return true;
  }

  boolean addWaypoint(double newLatitude_degreeDecimalMinutes, double newLongitude_degreeDecimalMinutes)
  {
    if (totalWaypoints >= (MAX_NUMBER_OF_WAYPOINTS - 1))
    {
      return false;
    }
    for (int waypointIndex = totalWaypoints; waypointIndex > (currentWaypoint + 1) ; waypointIndex--)
    {
      waypoints[waypointIndex].setLocation(waypoints[waypointIndex-1].latitude_degreeDecimalMinutes,
                                           waypoints[waypointIndex-1].longitude_degreeDecimalMinutes);
    }
    totalWaypoints += 1;
    if (totalWaypoints == 1)
    {
      currentWaypoint = 0;
    }
    else
    {
      currentWaypoint += 1;
    }
    waypoints[currentWaypoint].setLocation(newLatitude_degreeDecimalMinutes, newLongitude_degreeDecimalMinutes);
    return true;
  }

  double getDistanceToWaypoint_nauticalMiles(int waypointIndex, double currentLatitude_degreeDecimalMinutes, double currentLongitude_degreeDecimalMinutes)
  {
    if (totalWaypoints <= 0)
    {
      return 0.0;
    }
 
    // WGS-84 Round Earth
    double currentLatitude_radians = getRadiansFromDegrees(getDecimalDegreesFromDegreeDecimalMinutes(currentLatitude_degreeDecimalMinutes));
    double currentLongitude_radians = getRadiansFromDegrees(getDecimalDegreesFromDegreeDecimalMinutes(currentLongitude_degreeDecimalMinutes));

    double currentWaypointLatitude_radians = getRadiansFromDegrees(waypoints[waypointIndex].latitude_decimalDegrees);
    double currentWaypointLongitude_radians = getRadiansFromDegrees(waypoints[waypointIndex].longitude_decimalDegrees);

    double distanceCalc_haversine = sqrt( sin((currentLatitude_radians - currentWaypointLatitude_radians) / 2) * sin((currentLatitude_radians - currentWaypointLatitude_radians) / 2) +
                                          cos(currentLatitude_radians) * cos(currentWaypointLatitude_radians) *
                                          sin((currentLongitude_radians - currentWaypointLongitude_radians) / 2) * sin((currentLongitude_radians - currentWaypointLongitude_radians) / 2));

    return (2 * asin(distanceCalc_haversine) * EQUATORIAL_RADIUS_IN_NAUTICAL_MILES);
  }

  double getDistanceToHome_nauticalMiles(double currentLatitude_degreeDecimalMinutes, double currentLongitude_degreeDecimalMinutes)
  {
    double totalDistance_nauticalMiles = 0.0;  
    if (totalWaypoints > 0)
    {
      // Loop through the current waypoint back to the first. Add the accumulated
      // distance between each waypoints to get a total travel time to return home.
      for (int waypointIndex = currentWaypoint; waypointIndex >= 0; waypointIndex--)
      {
        totalDistance_nauticalMiles += getDistanceToWaypoint_nauticalMiles(waypointIndex, currentLatitude_degreeDecimalMinutes, currentLongitude_degreeDecimalMinutes);
        currentLatitude_degreeDecimalMinutes = waypoints[waypointIndex].latitude_degreeDecimalMinutes;
        currentLongitude_degreeDecimalMinutes = waypoints[waypointIndex].longitude_degreeDecimalMinutes;
      }
    }
    return totalDistance_nauticalMiles;
  }

  double getHeadingToCurrentWaypoint_degrees(double currentLatitude_degreeDecimalMinutes, double currentLongitude_degreeDecimalMinutes)
  {
    if (totalWaypoints <= 0)
    {
      return -1.0;
    }

    // WGS-84 Round Earth
    double currentLatitude_radians = getRadiansFromDegrees(getDecimalDegreesFromDegreeDecimalMinutes(currentLatitude_degreeDecimalMinutes));
    double currentLongitude_radians = getRadiansFromDegrees(getDecimalDegreesFromDegreeDecimalMinutes(currentLongitude_degreeDecimalMinutes));

    double currentWaypointLatitude_radians = getRadiansFromDegrees(waypoints[currentWaypoint].latitude_decimalDegrees);
    double currentWaypointLongitude_radians = getRadiansFromDegrees(waypoints[currentWaypoint].longitude_decimalDegrees);

    double deltaLongitude_radians = (currentWaypointLongitude_radians - currentLongitude_radians);
    double y = sin(deltaLongitude_radians) * cos(currentWaypointLatitude_radians);
    double x = cos(currentLatitude_radians) * sin(currentWaypointLatitude_radians) - sin(currentLatitude_radians) * cos(currentWaypointLatitude_radians) * cos(deltaLongitude_radians);
    double heading_radians = atan2(y, x);
    if (heading_radians < 0.0)
    {
      heading_radians += (2 * PI);
    }
    return (heading_radians * 180.0 / PI);
  }

  double currentWaypointLatitude_degreeDecimalMinutes()
  {
    if (totalWaypoints <= 0)
    {
      return 0.0;
    }
    return waypoints[currentWaypoint].latitude_degreeDecimalMinutes;
  }

  double currentWaypointLongitude_degreeDecimalMinutes()
  {
    if (totalWaypoints <= 0)
    {
      return 0.0;
    }
    return waypoints[currentWaypoint].longitude_degreeDecimalMinutes;
  }

  boolean deleteWaypoint()
  {
    if (totalWaypoints == 0)
    {
      return false;
    }
    for (int waypointIndex = currentWaypoint; waypointIndex < (totalWaypoints - 1) ; waypointIndex++)
    {
      waypoints[waypointIndex].setLocation(waypoints[waypointIndex+1].latitude_degreeDecimalMinutes,
                                           waypoints[waypointIndex+1].longitude_degreeDecimalMinutes);
    }
    totalWaypoints -= 1;
    if (currentWaypoint > 0)
    {
      currentWaypoint -= 1;
    }
    return true;
  }

  boolean proceedToPreviousWaypoint()
  {
    if (totalWaypoints <= 0)
    {
      return false;
    }
    currentWaypoint -= 1;
    if (currentWaypoint < 0)
    {
      currentWaypoint = totalWaypoints - 1;
    }
    return true;
  }

  boolean proceedToNextWaypoint()
  {
    if (totalWaypoints <= 0)
    {
      return false;
    }
    currentWaypoint += 1;
    if (currentWaypoint >= totalWaypoints)
    {
      currentWaypoint = 0;
    }
    return true;
  }
};

RouteModel currentRoute;

double getRelativeBearing_degrees(double currentHeading_degrees, double destinationHeading_degrees)
{
  double relativeBearing_degrees = destinationHeading_degrees - currentHeading_degrees;
  if (relativeBearing_degrees < -180.0)
  {
    relativeBearing_degrees += 360.0;
  }
  else if (relativeBearing_degrees > 180.0)
  {
    relativeBearing_degrees -= 360.0;
  }
  return relativeBearing_degrees;
}

// For better pressure precision, we need to know the resistance
// between X+ and X- Use any multimeter to read it
// The 2.8" TFT Touch shield has 300 ohms across the X plate
TouchScreen ts = TouchScreen(XP, YP, XM, YM, 300); //init TouchScreen port pins

void setup()
{
  // connect at 115200 so we can read the GPS fast enough and echo without dropping chars
  // also spit it out
  Serial.begin(115200);
  Serial.println("Program start!");

  currentRoute.clearRoute();

  // TFT
  // Initialize the digital pin as an output.
  pinMode(builtInLED, OUTPUT);
  Tft.init();

  // 9600 NMEA is the default baud rate for Adafruit MTK GPS's- some use 4800
  GPS.begin(9600);

  // uncomment this line to turn on RMC (recommended minimum) and GGA (fix data) including altitude
  GPS.sendCommand(PMTK_SET_NMEA_OUTPUT_RMCGGA);
  // uncomment this line to turn on only the "minimum recommended" data
  //GPS.sendCommand(PMTK_SET_NMEA_OUTPUT_RMCONLY);
  // For parsing data, we don't suggest using anything but either RMC only or RMC+GGA since
  // the parser doesn't care about other sentences at this time

  // Set the update rate
  GPS.sendCommand(PMTK_SET_NMEA_UPDATE_1HZ);   // 1 Hz update rate
  // For the parsing code to work nicely and have time to sort thru the data, and
  // print it out we don't suggest using anything higher than 1 Hz

  // Request updates on antenna status, comment out to keep quiet
  GPS.sendCommand(PGCMD_ANTENNA);

  // the nice thing about this code is you can have a timer0 interrupt go off
  // every 1 millisecond, and read data from the GPS for you. that makes the
  // loop code a heck of a lot easier!
  useInterrupt(true);

  delay(1000);
  // Ask for firmware version
  mySerial.println(PMTK_Q_RELEASE);

  drawMainScreenLabels();
  drawMainScreenValues();
  drawMainScreenMenu();
}

// Interrupt is called once a millisecond, looks for any new GPS data, and stores it
SIGNAL(TIMER0_COMPA_vect)
{
  char c = GPS.read();
  // if you want to debug, this is a good time to do it!
#ifdef UDR0
  if (GPSECHO)
    if (c) UDR0 = c;
    // writing direct to UDR0 is much much faster than Serial.print
    // but only one character can be written at a time.
#endif
}

void useInterrupt(boolean v)
{
  if (v)
  {
    // Timer0 is already used for millis() - we'll just interrupt somewhere
    // in the middle and call the "Compare A" function above
    OCR0A = 0xAF;
    TIMSK0 |= _BV(OCIE0A);
    usingInterrupt = true;
  }
  else
  {
    // do not call the interrupt function COMPA anymore
    TIMSK0 &= ~_BV(OCIE0A);
    usingInterrupt = false;
  }
}

uint32_t timer = millis();
void loop()                     // run over and over again
{
  // in case you are not using the interrupt above, you'll
  // need to 'hand query' the GPS, not suggested :(
  if (! usingInterrupt)
  {
    // read data from the GPS in the 'main loop'
    char c = GPS.read();
    // if you want to debug, this is a good time to do it!
    if (GPSECHO)
      if (c) Serial.print(c);
  }

  // if a sentence is received, we can check the checksum, parse it...
  if (GPS.newNMEAreceived())
  {
    // a tricky thing here is if we print the NMEA sentence, or data
    // we end up not listening and catching other sentences!
    // so be very wary if using OUTPUT_ALLDATA and trytng to print out data
    //Serial.println(GPS.lastNMEA());   // this also sets the newNMEAreceived() flag to false

    if (!GPS.parse(GPS.lastNMEA()))   // this also sets the newNMEAreceived() flag to false
      return;  // we can fail to parse a sentence in which case we should just wait for another
  }

  Point touchPoint = ts.getPoint();
  touchPoint.x = map(touchPoint.x, TS_MINX, TS_MAXX, 240, 0);
  touchPoint.y = map(touchPoint.y, TS_MINY, TS_MAXY, 320, 0);

  bool userTriggeredEvent = false;

  if (touchPoint.z > ts.pressureThreshhold)
  {
    switch (selectedScreen)
    {
      case 0:
        // Main
        switch (selectedConfirmation)
        {
          case 0:
            if (touchPoint.y > 190 && touchPoint.y < 220)
            {
              if (touchPoint.x < 70)
              {
                // Previous
                userTriggeredEvent = true;
                currentRoute.proceedToPreviousWaypoint();
              }
              else if (touchPoint.x > 75 && touchPoint.x < 125)
              {
                // Add
                selectedConfirmation = 1;
                userTriggeredEvent = true;
              }
              else if (touchPoint.x > 130 && touchPoint.x < 175)
              {
                // Delete
                selectedConfirmation = 2;
                userTriggeredEvent = true;
              }
              else if (touchPoint.x > 180)
              {
                // Next
                userTriggeredEvent = true;
                currentRoute.proceedToNextWaypoint();
              }
            }
            else if (touchPoint.y > 50 && touchPoint.y < 80 )
            {
              if (touchPoint.x > 10 && touchPoint.x < 50)
              {
                // New Route
                selectedConfirmation = 3;
                userTriggeredEvent = true;
              }
            }
            break;
          case 1:
            // Confirm Add Waypoint
            if (touchPoint.y > 290 && touchPoint.y < 320)
            {
              if (touchPoint.x < 125)
              {
                // Yes
                currentRoute.addWaypoint(GPS.latitude, GPS.longitude);
                selectedConfirmation = 0;
                userTriggeredEvent = true;
              }
              else if (touchPoint.x > 130)
              {
                // No
                selectedConfirmation = 0;
                userTriggeredEvent = true;
              }
            }
            break;
          case 2:
            // Confirm Delete Waypoint
            if (touchPoint.y > 290 && touchPoint.y < 320)
            {
              if (touchPoint.x < 125)
              {
                // Yes
                selectedConfirmation = 0;
                userTriggeredEvent = true;
                currentRoute.deleteWaypoint();
              }
              else if (touchPoint.x > 130)
              {
                // No
                selectedConfirmation = 0;
                userTriggeredEvent = true;
              }
            }
            break;
          case 3:
            // Confirm New Route
            if (touchPoint.y > 290 && touchPoint.y < 320)
            {
              if (touchPoint.x < 125)
              {
                // Yes
                currentRoute.clearRoute();
                selectedConfirmation = 0;
                userTriggeredEvent = true;
              }
              else if (touchPoint.x > 130)
              {
                // No
                selectedConfirmation = 0;
                userTriggeredEvent = true;
              }
            }
            break;
        } // (selectedConfirmation)
    } // (selectedScreen)
  } // (touchPoint.z > ts.pressureThreshhold)

  // if millis() or timer wraps around, we'll just reset it
  if (timer > millis())
  {
    timer = millis();
  }

  // approximately every 3 seconds or so, print out the current stats
  if (userTriggeredEvent || (millis() - timer > 3000))
  {
     drawMainScreenValues();
     // Reset the Timer
     timer = millis();
  }
  if (userTriggeredEvent)
  {
    // Redraw the menu as some choices may need to be drawn
    // while other choices may need to be removed.
    drawMainScreenMenu();
  }
}

bool drawMainScreenLabels()
{
  Tft.paintScreenBlack();

  // GPS Label
  Tft.drawString("GPS", 45, 10, 1, WHITE);

  // Time Label
  Tft.drawString("Time (UTC):", 5, 20, 1, WHITE);

  // Route Label
  Tft.drawString("Route", 5, 40, 1, WHITE);

  Tft.drawString("Current", 80, 80, 1, WHITE);

  Tft.drawString("Loc:", 5, 90, 1, WHITE);

  Tft.drawString("Spd (kts):", 5, 100, 1, WHITE);

  Tft.drawString("Hdg (deg):", 5, 110, 1, WHITE);

  Tft.drawString("To Waypoint:", 40, 130, 1, WHITE);

  Tft.drawString("Loc:", 5, 140, 1, WHITE);

  Tft.drawString("Dist (ft):", 5, 150, 1, WHITE);

  Tft.drawString("Hdg (deg):", 5, 160, 1, WHITE);

  Tft.drawString("Brg (deg):", 5, 170, 1, WHITE);

  Tft.drawString("Time to Arrive (min):", 5, 180, 1, WHITE);

  Tft.drawString("Dist to Home (ft):", 5, 220, 1, WHITE);

  Tft.drawString("Time to Home (min):", 5, 230, 1, WHITE);

  return true;
}

bool drawMainScreenMenu()
{
  // Clear out menu choices that may not longer be available.
  Tft.fillRectangle(0, 60, 239, 10, BLACK);
  Tft.fillRectangle(0, 200, 239, 10, BLACK);
  Tft.fillRectangle(0, 280, 239, 10, BLACK);
  Tft.fillRectangle(0, 300, 239, 10, BLACK);

  // Draw the available menu choices.
  switch (selectedConfirmation)
  {
    case 0:
      Tft.drawString("New", 20, 60, 1, CYAN);
      //Tft.drawString("Save", 70, 60, 1, GREEN);
      //Tft.drawString("Del", 135, 60, 1, RED);
      //Tft.drawString("Open", 180, 60, 1, YELLOW);
 
      Tft.drawString("Prev", 20, 200, 1, YELLOW);
      Tft.drawString("Add", 80, 200, 1, GREEN);
      Tft.drawString("Del", 135, 200, 1, RED);
      Tft.drawString("Next", 185, 200, 1, YELLOW);
      break;
    case 1:
      Tft.drawString("Confirm Add Waypoint", 38, 280, 1, WHITE);
      Tft.drawString("Yes", 50, 300, 1, GREEN);
      Tft.drawString("No", 150, 300, 1, RED);
      break;
    case 2:
      Tft.drawString("Confirm Delete Waypoint", 20, 280, 1, WHITE);
      Tft.drawString("Yes", 50, 300, 1, GREEN);
      Tft.drawString("No", 150, 300, 1, RED);
      break;
    case 3:
      Tft.drawString("Confirm New Route", 42, 280, 1, WHITE);
      Tft.drawString("Yes", 50, 300, 1, GREEN);
      Tft.drawString("No", 150, 300, 1, RED);
      break;
    default:
        break;
  }
}

bool drawMainScreenValues()
{
  //Tft.paintScreenBlack();

  // Number of Satellites
  String titleString = "(";
  titleString += String(GPS.satellites);
  titleString += " satellites)";
  char titleCharArray[40];
  titleString.toCharArray(titleCharArray, 40);
  Tft.fillRectangle(80, 10, 169, 10, BLACK);
  Tft.drawString(titleCharArray, 80, 10, 1, WHITE);

  String timeString = "";
  timeString += String(GPS.hour);
  timeString += ":";
  timeString += String(GPS.minute);
  if (GPS.minute < 10)
  {
    timeString += "0";
  }
  timeString += ":";
  timeString += String(GPS.seconds);
  if (GPS.seconds < 10)
  {
    timeString += "0";
  }
  char timeCharArray[40];
  timeString.toCharArray(timeCharArray, 40);
  Tft.fillRectangle(100, 20, 139, 10, BLACK);
  Tft.drawString(timeCharArray, 100, 20, 1, WHITE);

  // Current

  // Loc:
  String currentLocationString = "";
  char latitudeCharArray[10];
  String latitudeString = dtostrf(GPS.latitude, 1, 4, latitudeCharArray);
  currentLocationString += latitudeString;
  currentLocationString += " ";
  char longitudeCharArray[11];
  String longitudeString = dtostrf(GPS.longitude, 1, 4, longitudeCharArray);
  currentLocationString += longitudeString;
  char currentLocationCharArray[40];
  currentLocationString.toCharArray(currentLocationCharArray, 40);
  Tft.fillRectangle(42, 90, 197, 10, BLACK);
  Tft.drawString(currentLocationCharArray, 42, 90, 1, WHITE);

  // Spd (kts):
  String currentSpeedString = "";
  double currentSpeed_knots = GPS.speed;
  char speedCharArray[7];
  String speedString = dtostrf(currentSpeed_knots, 1, 1, speedCharArray);
  currentSpeedString += speedString;
  char currentSpeedCharArray[40];
  currentSpeedString.toCharArray(currentSpeedCharArray, 40);
  Tft.fillRectangle(90, 100, 149, 10, BLACK);
  Tft.drawString(currentSpeedCharArray, 90, 100, 1, WHITE);

  // Hdg (deg):
  String currentHeadingString = "";
  char headingCharArray[7];
  String headingString = dtostrf(GPS.angle, 1, 0, headingCharArray);
  currentHeadingString += headingString;
  char currentHeadingCharArray[40];
  currentHeadingString.toCharArray(currentHeadingCharArray, 40);
  Tft.fillRectangle(90, 110, 149, 10, BLACK);
  Tft.drawString(currentHeadingCharArray, 90, 110, 1, WHITE);

  // Altitude
  // gps.altitude ( in centimeters)
//  char fixQualityCharArray[20];
//  String fixQualityString = dtostrf(GPS.fixquality, 3, 0, fixQualityCharArray);
//  Tft.drawString(fixQualityCharArray, 5, 120, 1, WHITE);

  if (currentRoute.totalWaypoints > 0)
  {
    // To Waypoint:
    String toWaypointString = "";
    toWaypointString += (currentRoute.currentWaypoint + 1);
    toWaypointString += " of ";
    toWaypointString += currentRoute.totalWaypoints;
    char toWaypointCharArray[30];
    toWaypointString.toCharArray(toWaypointCharArray, 30);
    Tft.fillRectangle(140, 130, 99, 10, BLACK);
    Tft.drawString(toWaypointCharArray, 140, 130, 1, WHITE);

    // Loc:
    String currentWaypointLocationString = "";
    char waypointLatitudeCharArray[10];
    //String waypointLatitudeString = dtostrf(currentRoute.waypoints[currentRoute.currentWaypoint].latitude_decimalDegrees, 9, 4, waypointLatitudeCharArray);
    String waypointLatitudeString = dtostrf(currentRoute.currentWaypointLatitude_degreeDecimalMinutes(), 1, 4, waypointLatitudeCharArray);
    currentWaypointLocationString += waypointLatitudeString;
    currentWaypointLocationString += " ";
    char waypointLongitudeCharArray[11];
    //String waypointLongitudeString = dtostrf(currentRoute.waypoints[currentRoute.currentWaypoint].longitude_decimalDegrees, 10, 4, waypointLongitudeCharArray);
    String waypointLongitudeString = dtostrf(currentRoute.currentWaypointLongitude_degreeDecimalMinutes(), 1, 4, waypointLongitudeCharArray);
    currentWaypointLocationString += waypointLongitudeString;
    char currentWaypointLocationCharArray[40];
    currentWaypointLocationString.toCharArray(currentWaypointLocationCharArray, 40);
    Tft.fillRectangle(42, 140, 197, 10, BLACK);
    Tft.drawString(currentWaypointLocationCharArray, 42, 140, 1, WHITE);

    // Dist (ft):
    double distanceFromCurrentWaypoint_nauticalMiles = currentRoute.getDistanceToWaypoint_nauticalMiles(currentRoute.currentWaypoint, GPS.latitude, GPS.longitude);
    String distanceToWaypointString = "";
    char distanceToWaypointCharArray[20];
    String distanceValueToWaypointString = dtostrf((distanceFromCurrentWaypoint_nauticalMiles * 6076.12), 1, 0, distanceToWaypointCharArray);
    distanceToWaypointString += distanceValueToWaypointString;
    char currentDistanceToWaypointCharArray[40];
    distanceToWaypointString.toCharArray(distanceToWaypointCharArray, 40);
    Tft.fillRectangle(90, 150, 149, 10, BLACK);
    Tft.drawString(distanceToWaypointCharArray, 90, 150, 1, WHITE);

    // Hdg (deg):
    double headingToCurrentWaypoint_degrees = currentRoute.getHeadingToCurrentWaypoint_degrees(GPS.latitude, GPS.longitude);
    String headingToWaypointString = "";
    char headingToWaypointCharArray[20];
    String headingValueToWaypointString = dtostrf(headingToCurrentWaypoint_degrees, 1, 0, headingToWaypointCharArray);
    headingToWaypointString += headingValueToWaypointString;
    char currentHeadingToWaypointCharArray[40];
    headingToWaypointString.toCharArray(headingToWaypointCharArray, 40);
    Tft.fillRectangle(90, 160, 149, 10, BLACK);
    Tft.drawString(headingToWaypointCharArray, 90, 160, 1, WHITE);

    // Brg (deg):
    double relativeBearingToCurrentWaypoint_degrees = getRelativeBearing_degrees(GPS.angle, headingToCurrentWaypoint_degrees);
    String bearingToWaypointString = "";
    char bearingToWaypointCharArray[20];
    String bearingValueToWaypointString = dtostrf(relativeBearingToCurrentWaypoint_degrees, 1, 0, bearingToWaypointCharArray);
    bearingToWaypointString += bearingValueToWaypointString;
    char currentBearingToWaypointCharArray[40];
    bearingToWaypointString.toCharArray(currentBearingToWaypointCharArray, 40);
    Tft.fillRectangle(90, 170, 149, 10, BLACK);
    Tft.drawString(currentBearingToWaypointCharArray, 90, 170, 1, WHITE);

    // Time to Arrive (min):
    String timeToArriveString = "";
    if (currentSpeed_knots > 0.0)
    {
      double timeToArrive_minutes = distanceFromCurrentWaypoint_nauticalMiles / currentSpeed_knots * 60.0;
      if (timeToArrive_minutes < 9999)
      {
        // If stopped (or ridiculously far away), then show nothing.
        char timeToArriveCharArray_minutes[20];
        String timeToArriveString_minutes = dtostrf(timeToArrive_minutes, 1, 0, timeToArriveCharArray_minutes);
        timeToArriveString += timeToArriveString_minutes;
      }
    }
    char timeToArriveCharArray[40];
    timeToArriveString.toCharArray(timeToArriveCharArray, 40);
    Tft.fillRectangle(178, 180, 61, 10, BLACK);
    Tft.drawString(timeToArriveCharArray, 178, 180, 1, WHITE);

    // Dist to Home (ft):
    double distanceToHome_nauticalMiles = currentRoute.getDistanceToHome_nauticalMiles(GPS.latitude, GPS.longitude);
    String distanceToHomeString = "";
    char distanceToHomeCharArray[20];
    String distanceValueToHomeString = dtostrf((distanceToHome_nauticalMiles * 6076.12), 1, 0, distanceToHomeCharArray);
    distanceToHomeString += distanceValueToHomeString;
    char currentDistanceToHomeCharArray[40];
    distanceToHomeString.toCharArray(distanceToHomeCharArray, 40);
    Tft.fillRectangle(165, 220, 74, 10, BLACK);
    Tft.drawString(distanceToHomeCharArray, 165, 220, 1, WHITE);

    // Time to Home (min):
    String timeToHomeString = "";
    if (currentSpeed_knots > 0.0)
    {
      double timeToHome_minutes = distanceToHome_nauticalMiles / currentSpeed_knots * 60.0;
      if (timeToHome_minutes < 9999)
      {
        // If stopped (or ridiculously far away), then show nothing.
        char timeToHomeCharArray_minutes[20];
        String timeToHomeString_minutes = dtostrf(timeToHome_minutes, 1, 0, timeToHomeCharArray_minutes);
        timeToHomeString += timeToHomeString_minutes;
      }
    }
    char timeToHomeCharArray[40];
    timeToHomeString.toCharArray(timeToHomeCharArray, 40);
    Tft.fillRectangle(165, 230, 74, 10, BLACK);
    Tft.drawString(timeToHomeCharArray, 165, 230, 1, WHITE);
  }
  else
  {
    // To Waypoint:  
    Tft.fillRectangle(140, 130, 99, 10, BLACK);
    // Loc:
    Tft.fillRectangle(42, 140, 197, 10, BLACK);
    // Dist (ft):
    Tft.fillRectangle(90, 150, 149, 10, BLACK);
    // Hdg (deg):
    Tft.fillRectangle(90, 160, 149, 10, BLACK);
    // Brg (deg):
    Tft.fillRectangle(90, 170, 149, 10, BLACK);
    // Time to Arrive (min):
    Tft.fillRectangle(178, 180, 61, 10, BLACK);
 
    // Dist to Home (ft):
    Tft.fillRectangle(165, 220, 74, 10, BLACK);
    // Time to Home (min):
    Tft.fillRectangle(165, 230, 74, 10, BLACK);
  }

  return true;
}


The code within this post is released into the public domain. You're free to use it however you wish, but it is provided "as-is" without warranty of any kind. In no event shall the author be liable for any claims or damages in connection with this software.

Friday, November 28, 2014

Pebble Watchface: Parsing JSON Weather

For my Watchface, I wanted to see current conditions (temperature / wind speed) and the forecast conditions (will it rain today or tomorrow?). There are times when the current conditions are clear skies but the forecast for later that day is rain; I wanted to be able to see both pieces of information at the same time.

The weather information on the watch is retrieved from openweathermap.org in the JSON format. I make 2 calls for weather, one for the current conditions and one for forecast.

The URL for current conditions:
  var url = "http://api.openweathermap.org/data/2.5/weather?lat=" +
      pos.coords.latitude + "&lon=" + pos.coords.longitude;

The URL for forecast conditions:
  var forecasturl = "http://api.openweathermap.org/data/2.5/forecast/daily?lat=" +
      pos.coords.latitude + "&lon=" + pos.coords.longitude;

Open Weather Map returns the weather data in JSON format.

For an example, we'll pull the weather from Traverse City, Michigan (N44.7681 W86.6222). Winter time in Michigan should have quite interesting weather.

Current Conditions URL:
http://api.openweathermap.org/data/2.5/weather?lat=44.7681&lon=-85.6222
(You can type this URL in your web browser to see the output.)

Current Conditions Raw Output:
{"coord":{"lon":-85.62,"lat":44.77},"sys":{"type":1,"id":1459,"message":0.0399,"country":"US","sunrise":1417265884,"sunset":1417298637},"weather":[{"id":600,"main":"Snow","description":"light snow","icon":"13n"}],"base":"cmc stations","main":{"temp":268.55,"pressure":1017,"humidity":79,"temp_min":267.15,"temp_max":269.15},"wind":{"speed":1.5,"deg":0},"clouds":{"all":90},"dt":1417225020,"id":5012495,"name":"Traverse City","cod":200}

Forecast Conditions URL:
http://api.openweathermap.org/data/2.5/forecast/daily?lat=44.7681&lon=-85.6222
(You can type this URL in your web browser to see the output.)

Forecast Conditions Raw Output:
{"cod":"200","message":0.0066,"city":{"id":5012495,"name":"Traverse City","coord":{"lon":-85.620628,"lat":44.763062},"country":"US","population":0},"cnt":7,"list":[{"dt":1417194000,"temp":{"day":269.15,"min":268.92,"max":270.14,"night":270.14,"eve":269.15,"morn":269.15},"pressure":1004.17,"humidity":100,"weather":[{"id":601,"main":"Snow","description":"snow","icon":"13d"}],"speed":7.88,"deg":170,"clouds":92,"snow":2},{"dt":1417280400,"temp":{"day":278.83,"min":275.01,"max":279.23,"night":278.33,"eve":278.59,"morn":275.01},"pressure":992.92,"humidity":90,"weather":[{"id":600,"main":"Snow","description":"light snow","icon":"13d"}],"speed":7.13,"deg":195,"clouds":48,"snow":0.5},{"dt":1417366800,"temp":{"day":279.25,"min":272.88,"max":279.25,"night":272.88,"eve":275.6,"morn":276.1},"pressure":993.15,"humidity":94,"weather":[{"id":800,"main":"Clear","description":"sky is clear","icon":"02d"}],"speed":7.06,"deg":232,"clouds":8},{"dt":1417453200,"temp":{"day":269.83,"min":267.55,"max":270.65,"night":267.55,"eve":269,"morn":270.65},"pressure":1020.68,"humidity":0,"weather":[{"id":600,"main":"Snow","description":"light snow","icon":"13d"}],"speed":11.08,"deg":308,"clouds":69,"snow":0.82},{"dt":1417539600,"temp":{"day":271.5,"min":268.24,"max":273.72,"night":273.72,"eve":272.95,"morn":268.24},"pressure":1020.55,"humidity":0,"weather":[{"id":600,"main":"Snow","description":"light snow","icon":"13d"}],"speed":8.29,"deg":178,"clouds":0,"snow":0.26},{"dt":1417626000,"temp":{"day":279.39,"min":271.41,"max":279.39,"night":271.41,"eve":276.42,"morn":276.33},"pressure":986.23,"humidity":0,"weather":[{"id":600,"main":"Snow","description":"light snow","icon":"13d"}],"speed":12.83,"deg":208,"clouds":93,"rain":3.44,"snow":0.22},{"dt":1417712400,"temp":{"day":272.6,"min":271.5,"max":272.6,"night":272.49,"eve":272.56,"morn":271.5},"pressure":1003.13,"humidity":0,"weather":[{"id":601,"main":"Snow","description":"snow","icon":"13d"}],"speed":13.59,"deg":285,"clouds":47,"snow":4.52}]}

I found a handy parser online where you could paste JSON data and it shows it to you in an organized fashion: http://json.parser.online.fr/

Paste the raw output above into that parser to see the results.

Parsed Current Conditions:
{
  • "coord":{
    • "lon":-85.62,
    • "lat":44.77
    }
    ,
  • "sys":{
    • "type":1,
    • "id":1459,
    • "message":0.0399,
    • "country":"US",
    • "sunrise":1417265884,
    • "sunset":1417298637
    }
    ,
  • "weather":[
    1. {
      • "id":600,
      • "main":"Snow",
      • "description":"light snow",
      • "icon":"13n"
      }
    ]
    ,
  • "base":"cmc stations",
  • "main":{
    • "temp":268.55,
    • "pressure":1017,
    • "humidity":79,
    • "temp_min":267.15,
    • "temp_max":269.15
    }
    ,
  • "wind":{
    • "speed":1.5,
    • "deg":0
    }
    ,
  • "clouds":{
    • "all":90
    }
    ,
  • "dt":1417225020,
  • "id":5012495,
  • "name":"Traverse City",
  • "cod":200
}

Parsed Forecast Conditions:
{
  • "cod":"200",
  • "message":0.0066,
  • "city":{
    • "id":5012495,
    • "name":"Traverse City",
    • "coord":{
      • "lon":-85.620628,
      • "lat":44.763062
      }
      ,
    • "country":"US",
    • "population":0
    }
    ,
  • "cnt":7,
  • "list":[
    1. {
      • "dt":1417194000,
      • "temp":{
        • "day":269.15,
        • "min":268.92,
        • "max":270.14,
        • "night":270.14,
        • "eve":269.15,
        • "morn":269.15
        }
        ,
      • "pressure":1004.17,
      • "humidity":100,
      • "weather":[
        1. {
          • "id":601,
          • "main":"Snow",
          • "description":"snow",
          • "icon":"13d"
          }
        ]
        ,
      • "speed":7.88,
      • "deg":170,
      • "clouds":92,
      • "snow":2
      }
      ,
    2. {
      • "dt":1417280400,
      • "temp":{
        • "day":278.83,
        • "min":275.01,
        • "max":279.23,
        • "night":278.33,
        • "eve":278.59,
        • "morn":275.01
        }
        ,
      • "pressure":992.92,
      • "humidity":90,
      • "weather":[
        1. {
          • "id":600,
          • "main":"Snow",
          • "description":"light snow",
          • "icon":"13d"
          }
        ]
        ,
      • "speed":7.13,
      • "deg":195,
      • "clouds":48,
      • "snow":0.5
      }
      ,
    3. {
      • "dt":1417366800,
      • "temp":{
        • "day":279.25,
        • "min":272.88,
        • "max":279.25,
        • "night":272.88,
        • "eve":275.6,
        • "morn":276.1
        }
        ,
      • "pressure":993.15,
      • "humidity":94,
      • "weather":[
        1. {
          • "id":800,
          • "main":"Clear",
          • "description":"sky is clear",
          • "icon":"02d"
          }
        ]
        ,
      • "speed":7.06,
      • "deg":232,
      • "clouds":8
      }
      ,
    4. {
      • "dt":1417453200,
      • "temp":{
        • "day":269.83,
        • "min":267.55,
        • "max":270.65,
        • "night":267.55,
        • "eve":269,
        • "morn":270.65
        }
        ,
      • "pressure":1020.68,
      • "humidity":0,
      • "weather":[
        1. {
          • "id":600,
          • "main":"Snow",
          • "description":"light snow",
          • "icon":"13d"
          }
        ]
        ,
      • "speed":11.08,
      • "deg":308,
      • "clouds":69,
      • "snow":0.82
      }
      ,
    5. {
      • "dt":1417539600,
      • "temp":{
        • "day":271.5,
        • "min":268.24,
        • "max":273.72,
        • "night":273.72,
        • "eve":272.95,
        • "morn":268.24
        }
        ,
      • "pressure":1020.55,
      • "humidity":0,
      • "weather":[
        1. {
          • "id":600,
          • "main":"Snow",
          • "description":"light snow",
          • "icon":"13d"
          }
        ]
        ,
      • "speed":8.29,
      • "deg":178,
      • "clouds":0,
      • "snow":0.26
      }
      ,
    6. {
      • "dt":1417626000,
      • "temp":{
        • "day":279.39,
        • "min":271.41,
        • "max":279.39,
        • "night":271.41,
        • "eve":276.42,
        • "morn":276.33
        }
        ,
      • "pressure":986.23,
      • "humidity":0,
      • "weather":[
        1. {
          • "id":600,
          • "main":"Snow",
          • "description":"light snow",
          • "icon":"13d"
          }
        ]
        ,
      • "speed":12.83,
      • "deg":208,
      • "clouds":93,
      • "rain":3.44,
      • "snow":0.22
      }
      ,
    7. {
      • "dt":1417712400,
      • "temp":{
        • "day":272.6,
        • "min":271.5,
        • "max":272.6,
        • "night":272.49,
        • "eve":272.56,
        • "morn":271.5
        }
        ,
      • "pressure":1003.13,
      • "humidity":0,
      • "weather":[
        1. {
          • "id":601,
          • "main":"Snow",
          • "description":"snow",
          • "icon":"13d"
          }
        ]
        ,
      • "speed":13.59,
      • "deg":285,
      • "clouds":47,
      • "snow":4.52
      }
    ]
}

With the data parsed using the handy online tool, it is very easy to visualize how it is structured and how we can read the data inside.

For example on the forecast:
     "list":[

  1. {
    • "dt":1417194000,
    • "temp":{
      • "min":268.92,
      • "max":270.14,
      • },
    • "weather":[
      1. {
        • "id":601,
        • "main":"Snow",
        • "description":"snow",
        • "icon":"13d"
        }
      ]
      ,

To retrieve the dt value for the first day, our JavaScript code will be: json.list[0].dt
To retrieve it for the second day: json.list[1].dt

Min/max temperature is in a group within the primary list.
To retrieve the minimum temperature for the first day: json.list[0].temp.min
To retrieve it for the second day: json.list[1].temp.min

Finally the weather grouping is also an array (note the []s); it's just an array of 1 entry. To get a value from there, we give an index.
To retrieve the "main" weather description for the first day: json.list[0].weather[0].main
To retrieve it for the second day: json.list[1].weather[0].main

Current Weather Conditions

Let's look at the simpler case first, the Current Weather conditions.

The JavaScript code for the query: (Some data has been commented out because I'm not using it in the watch face; however, it may be of value to you.)
  // Construct URL
  var url = "http://api.openweathermap.org/data/2.5/weather?lat=" +
      pos.coords.latitude + "&lon=" + pos.coords.longitude;

  // Send request to OpenWeatherMap
  xhrRequest(url, 'GET', 
    function(responseText) {
      // responseText contains a JSON object with weather info
      var json = JSON.parse(responseText);

      // Temperature in Kelvin requires adjustment
      var temperature = Math.round(json.main.temp - 273.15);

      // Conditions
      //var conditions = json.weather[0].main;      
      
      // Temperature Min
      //var temperatureMin = Math.round(json.main.temp_min - 273.15);
      
      // Temperature Min
      //var temperatureMax = Math.round(json.main.temp_max - 273.15);
      
      // Wind Speed
      var windSpeed = Math.round(json.wind.speed);
      
      // Wind Direction
      var windDirection = Math.round(json.wind.deg);
      
      // Humidity
      //var humidity = Math.round(json.main.humidity);
      
      // Description
      var description = json.weather[0].description;      
      
      // Assemble dictionary using our keys
      var dictionary = {
        "KEY_TEMPERATURE": temperature,
        "KEY_WIND_SPEED": windSpeed,
        "KEY_WIND_DIRECTION": windDirection,
        "KEY_DESCRIPTION": description
      };
//        "KEY_TEMP_MIN": temperatureMin,
//        "KEY_TEMP_MAX": temperatureMax,
//        "KEY_CONDITIONS": conditions,
//        "KEY_HUMIDITY": humidity,

      // Send to Pebble
      Pebble.sendAppMessage(dictionary,
        function(e) {
          //console.log("Weather info sent to Pebble successfully WX!");
        },
        function(e) {
          //console.log("Error sending weather info to Pebble WX!");
        }
      );
    }      
  );

What happens is the JavaScript code is sending out a query for the weather conditions and getting the response in the JSON format. The JavaScript code then pulls out the values it cares about, associates them with keys I have defined, and builds a dictionary array that is sent to the Pebble C code.

As you can see, JSON returns a wealth of data, but I'm only using the current temperature, wind speed, wind direction, and description.

After some research, I found out the current low and high temperatures returned from the current conditions query aren't actually from forecast data; they're formulated by other conditions throughout the day. The values are not reliable and give poor results. To get good values for the min and max temperature of the day, you must make a separate query for the forecast conditions.

The "description" from JSON is far more descriptive than "main". In this example, the "main" is "Snow" but the description is "light snow". I have room on my text layer so I want to be as descriptive as I can so I went with the "description".

I'm using CloudPebble for my watch face development. Under the Settings section of CloudPebble, I have Message Keys that correspond with the variable keys you see above:
KEY_TEMPERATURE = 0
KEY_CONDITIONS = 1
KEY_TEMP_MIN = 2
KEY_TEMP_MAX = 3
KEY_WIND_SPEED = 4
KEY_WIND_DIRECTION = 5
KEY_HUMIDITY = 6
KEY_DESCRIPTION = 7

The corresponding keys are also #defined in the C code:
#define KEY_TEMPERATURE 0
#define KEY_CONDITIONS 1
#define KEY_TEMP_MIN 2
#define KEY_TEMP_MAX 3
#define KEY_WIND_SPEED 4
#define KEY_WIND_DIRECTION 5
#define KEY_HUMIDITY 6
#define KEY_DESCRIPTION 7

There are existing tutorials on how to setup inbox callbacks with the JavaScript code, so I'll mostly gloss over those details.

In the init(), the inbox_received_callback has been setup to receive the call from the JavaScript code:
  app_message_register_inbox_received(inbox_received_callback);

The inbox_received_callback itself:
static void inbox_received_callback(DictionaryIterator *iterator, void *context)
{
  ...
  // Read first item  Tuple *t = dict_read_first(iterator);

  // For all items
  while(t != NULL)
  {
    // Which key was received?
    switch(t->key)
    {
      case KEY_TEMPERATURE:
        currentTemperature_c = t->value->int32;
        break;
//      case KEY_CONDITIONS:
//        // Current conditions (abbreviated).
//        break;
//      case KEY_TEMP_MIN:
//        // Not reliably low temperature.
//        break;
//      case KEY_TEMP_MAX:
//        // Not reliably high temperature.
//        break;
      case KEY_WIND_SPEED:
        // Reported in meters per second, convert to knots.
        currentWindSpeed_metersPerSecond = t->value->int32;
        break;
      case KEY_WIND_DIRECTION:
        currentWindDirection_deg = t->value->int32;
        break;
//      case KEY_HUMIDITY:
//        break;
      case KEY_DESCRIPTION:
        // Similar to conditions, but far more descriptive.
        strncpy(currentConditions, t->value->cstring, 32);
        break;
      ...
      default:
        APP_LOG(APP_LOG_LEVEL_ERROR, "Key %d not recognized!", (int)t->key);
        break;
    }

    // Look for next item
    t = dict_read_next(iterator);
  }
  ...
  update_weather();
}

In the above code, you can see how the keys that were in the JavaScript code, included in the CloudPebble Settings, and #defined at the top of the C code, are now fully retrieved.

currentTemperature_c, currentWindSpeed_metersPerSecond,currentWindDirection_deg, and currentConditions are defined as global variables at the top of the C code:
static int currentTemperature_c;
static char currentConditions[32];
static int currentWindDirection_deg;
static int currentWindSpeed_metersPerSecond;

The update_weather() function takes those values and updates the text layers on the watch face.

Forecast Weather Conditions

Now for the trickier one, the forecast conditions. The forecast includes 7 days worth of weather data. You can't assume the first weather condition is today, the second weather condition is tomorrow, etc. You must read the date to determine which day the forecast belongs to. Sometimes the first entry of the retrieved data is not in fact today's forecast, it is yesterday's! To be able to get today's and tomorrow's forecast, I have to pull 3 values from the forecast JSON.

Each day's conditions includes a "dt" value which is the date/time of that forecast in UNIX format. We'll be reading that "dt" value to determine what day it belongs to.

For reference, I found a handy UNIX time calculator here: http://www.onlineconversion.com/unix_time.htm Just give it in the "dt" value and it will reply with a more human-friendly date and time.

The JavaScript code:
  // Construct URL
  var forecasturl = "http://api.openweathermap.org/data/2.5/forecast/daily?lat=" +
      pos.coords.latitude + "&lon=" + pos.coords.longitude;

  // Send request to OpenWeatherMap
  xhrRequest(forecasturl, 'GET', 
    function(responseForecastText) {
      // responseText contains a JSON object with weather info
      var json = JSON.parse(responseForecastText);

      var day1Time = json.list[0].dt;
      
      // Conditions
      var day1Conditions = json.list[0].weather[0].main;      
      
      // Temperature in Kelvin requires adjustment
      var day1TemperatureMin = Math.round(json.list[0].temp.min - 273.15);

      // Temperature in Kelvin requires adjustment
      var day1TemperatureMax = Math.round(json.list[0].temp.max - 273.15);

      var day2Time = json.list[1].dt;
      
      // Conditions
      var day2Conditions = json.list[1].weather[0].main;      
           
      // Temperature in Kelvin requires adjustment
      var day2TemperatureMin = Math.round(json.list[1].temp.min - 273.15);

      // Temperature in Kelvin requires adjustment
      var day2TemperatureMax = Math.round(json.list[1].temp.max - 273.15);

      var day3Time = json.list[2].dt;
      
      // Conditions
      var day3Conditions = json.list[2].weather[0].main;      
           
      // Temperature in Kelvin requires adjustment
      var day3TemperatureMin = Math.round(json.list[2].temp.min - 273.15);

      // Temperature in Kelvin requires adjustment
      var day3TemperatureMax = Math.round(json.list[2].temp.max - 273.15);

      // Assemble dictionary using our keys
      var dictionary = {
        "KEY_DAY1_TIME": day1Time,
        "KEY_DAY1_CONDITIONS": day1Conditions,
        "KEY_DAY1_TEMP_MIN": day1TemperatureMin,
        "KEY_DAY1_TEMP_MAX": day1TemperatureMax,
        "KEY_DAY2_TIME": day2Time,
        "KEY_DAY2_CONDITIONS": day2Conditions,
        "KEY_DAY2_TEMP_MIN": day2TemperatureMin,
        "KEY_DAY2_TEMP_MAX": day2TemperatureMax,
        "KEY_DAY3_TIME": day3Time,
        "KEY_DAY3_CONDITIONS": day3Conditions,
        "KEY_DAY3_TEMP_MIN": day3TemperatureMin,
        "KEY_DAY3_TEMP_MAX": day3TemperatureMax
      };

      // Send to Pebble
      Pebble.sendAppMessage(dictionary,
        function(e) {
          //console.log("Weather info sent to Pebble successfully WX!");
        },
        function(e) {
          //console.log("Error sending weather info to Pebble WX!");
        }
      );
    }      
  );

The keys for CloudPebble:
KEY_DAY1_CONDITIONS = 8
KEY_DAY1_TEMP_MIN = 9
KEY_DAY1_TEMP_MAX = 10
KEY_DAY1_TIME = 11
KEY_DAY2_CONDITIONS = 12
KEY_DAY2_TEMP_MIN = 13
KEY_DAY2_TEMP_MAX = 14
KEY_DAY2_TIME = 15
KEY_DAY3_CONDITIONS = 16
KEY_DAY3_TEMP_MIN = 17
KEY_DAY3_TEMP_MAX = 18
KEY_DAY3_TIME = 19

The corresponding keys #defined in the C code:
#define KEY_DAY1_CONDITIONS 8
#define KEY_DAY1_TEMP_MIN 9
#define KEY_DAY1_TEMP_MAX 10
#define KEY_DAY1_TIME 11
#define KEY_DAY2_CONDITIONS 12
#define KEY_DAY2_TEMP_MIN 13
#define KEY_DAY2_TEMP_MAX 14
#define KEY_DAY2_TIME 15
#define KEY_DAY3_CONDITIONS 16
#define KEY_DAY3_TEMP_MIN 17
#define KEY_DAY3_TEMP_MAX 18
#define KEY_DAY3_TIME 19

And now the C code:
static void inbox_received_callback(DictionaryIterator *iterator, void *context)
{
  ...
  // Read first item
  Tuple *t = dict_read_first(iterator);

  int day1Date = 0;
  int day2Date = 0;
  //int day3Date = 0;
  int day1LowTemperature_c = 0;
  int day2LowTemperature_c = 0;
  int day3LowTemperature_c = 0;
  int day1HighTemperature_c = 0;
  int day2HighTemperature_c = 0;
  int day3HighTemperature_c = 0;
  char day1Conditions[32];
  char day2Conditions[32];
  char day3Conditions[32];

  // For all items
  while(t != NULL)
  {
    // Which key was received?
    switch(t->key)
    {
      ...
      case KEY_DAY1_TIME:
        // Usually today's date, but in the morning it's yesterday's!
        day1Date = t->value->int32;
        break;
      case KEY_DAY1_CONDITIONS:
        // Today's condition (abbreviated).
        //snprintf(day1_conditions_buffer, sizeof(day1_conditions_buffer), "%s", t->value->cstring);
        strncpy(day1Conditions, t->value->cstring, 32);
        break;
      case KEY_DAY1_TEMP_MIN:
        //currentLowTemperature_c = t->value->int32;
        day1LowTemperature_c = t->value->int32;
        break;
      case KEY_DAY1_TEMP_MAX:
        //currentHighTemperature_c = t->value->int32;
        day1HighTemperature_c = t->value->int32;
        break;
      case KEY_DAY2_TIME:
        // Usually it's tomorrow's date, but in the morning it's today's!.
        //forecastDate = t->value->int32;
        day2Date = t->value->int32;
        break;
      case KEY_DAY2_CONDITIONS:
        // Forecast condition (abbreviated).
        //strncpy(forecastConditions, t->value->cstring, 32);
        strncpy(day2Conditions, t->value->cstring, 32);
        break;
      case KEY_DAY2_TEMP_MIN:
        //forecastLowTemperature_c = t->value->int32;
        day2LowTemperature_c = t->value->int32;
        break;
      case KEY_DAY2_TEMP_MAX:
        //forecastHighTemperature_c = t->value->int32;
        day2HighTemperature_c = t->value->int32;
        break;
      case KEY_DAY3_TIME:
        // Usually it's in two days, but in the morning it's tomorrow's!
        //day3Date = t->value->int32;
        break;
      case KEY_DAY3_CONDITIONS:
        // Forecast condition (abbreviated).
        strncpy(day3Conditions, t->value->cstring, 32);
        break;
      case KEY_DAY3_TEMP_MIN:
        //day3LowTemperature_c = t->value->int32;
        day3LowTemperature_c = t->value->int32;
        break;
      case KEY_DAY3_TEMP_MAX:
        day3HighTemperature_c = t->value->int32;
        break;
        ...
      default:
        APP_LOG(APP_LOG_LEVEL_ERROR, "Key %d not recognized!", (int)t->key);
        break;
    }

    // Look for next item
    t = dict_read_next(iterator);
  }

  if (day1Date > 0)
  {
    // Forecast Response
    time_t currentTime = time(NULL);
    struct tm *currentCalendarTime = localtime(&currentTime);
    int dayOfMonthCurrent = currentCalendarTime->tm_mday;
    
    time_t day1Date_t = day1Date;
    struct tm *day1CalendarTime = localtime(&day1Date_t);
    int dayOfMonth1 = day1CalendarTime->tm_mday;
    
    time_t day2Date_t = day2Date;
    struct tm *day2CalendarTime = localtime(&day2Date_t);
    int dayOfMonth2 = day2CalendarTime->tm_mday;
    
    if (dayOfMonthCurrent == dayOfMonth1)
    {
      // Day 1 is Today's Date
      currentDate = day1Date;
      strncpy(currentDayForecastConditions, day1Conditions, 32);
      currentLowTemperature_c = day1LowTemperature_c;
      currentHighTemperature_c = day1HighTemperature_c;
      
      // So Day 2 will be the forecast.
      strncpy(forecastConditions, day2Conditions, 32);
      forecastLowTemperature_c = day2LowTemperature_c;
      forecastHighTemperature_c = day2HighTemperature_c;
    }
    else if (dayOfMonthCurrent == dayOfMonth2)
    {
      // Day 2 is Today's Date 
      currentDate = day2Date;
      strncpy(currentDayForecastConditions, day2Conditions, 32);
      currentLowTemperature_c = day2LowTemperature_c;
      currentHighTemperature_c = day2HighTemperature_c;

      // So Day 3 will be the forecast.
      strncpy(forecastConditions, day3Conditions, 32);
      forecastLowTemperature_c = day3LowTemperature_c;
      forecastHighTemperature_c = day3HighTemperature_c;
    }
  } // (day1Date > 0)

  ...
  update_weather();
}

The key piece above is determining if the first forecast condition is today's date or yesterday's.

I get the current day of the month:
    time_t currentTime = time(NULL);
    struct tm *currentCalendarTime = localtime(&currentTime);
    int dayOfMonthCurrent = currentCalendarTime->tm_mday;

the first forecast day of the month:    
    time_t day1Date_t = day1Date;
    struct tm *day1CalendarTime = localtime(&day1Date_t);
    int dayOfMonth1 = day1CalendarTime->tm_mday;

and the second forecast day of the month:
    time_t day2Date_t = day2Date;
    struct tm *day2CalendarTime = localtime(&day2Date_t);
    int dayOfMonth2 = day2CalendarTime->tm_mday;

If my current day of the month equals the first forecast day:
    if (dayOfMonthCurrent == dayOfMonth1)
    {
Then I know the first value from the JSON data is today's forecast (and the second value is tomorrow's):
      // Day 1 is Today's Date
      currentDate = day1Date;
      strncpy(currentDayForecastConditions, day1Conditions, 32);
      currentLowTemperature_c = day1LowTemperature_c;
      currentHighTemperature_c = day1HighTemperature_c;
      
      // So Day 2 will be the forecast.
      strncpy(forecastConditions, day2Conditions, 32);
      forecastLowTemperature_c = day2LowTemperature_c;
      forecastHighTemperature_c = day2HighTemperature_c;

Else if my current day of the month equals the second forecast day:
    else if (dayOfMonthCurrent == dayOfMonth2)
    {
Then I know the second value from the JSON data is today's forecast (and the third value is tomorrow's):
      // Day 2 is Today's Date 
      currentDate = day2Date;
      strncpy(currentDayForecastConditions, day2Conditions, 32);
      currentLowTemperature_c = day2LowTemperature_c;
      currentHighTemperature_c = day2HighTemperature_c;

      // So Day 3 will be the forecast.
      strncpy(forecastConditions, day3Conditions, 32);
      forecastLowTemperature_c = day3LowTemperature_c;
      forecastHighTemperature_c = day3HighTemperature_c;

Please refer to the first Pebble Watchface post for the full source code. Hopefully this has aided you in parsing JSON / weather data!