Saturday, December 26, 2020

RPG: Networked Events and Time of Day

The character states and magical effects were being shared between the server and clients, but interactions were not. The client players couldn't go up to a NPC and talk, heal, buy/sell, or enable tactics. It was a substantial amount of work, but client players can now do all interactions with a NPC that the server itself could do. Even the inventory of a client character is shared to the server so server events that check if a player was carrying an item works.

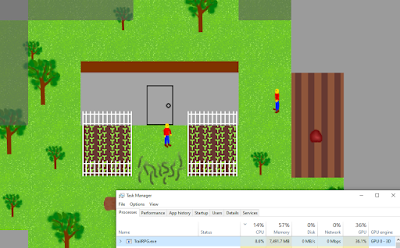
As the engine improves, I need more content to test its capabilities and have something to "play". I added the concept of time of day and events that can be triggered off that time. As well as actions that can create or remove characters. Now I can have pirates that show up on the coast when it gets late, raid the village, then leave. The time of day also influences how much the player can see. During the night the vision radius reduces substantially.


There is an indication of the current time of day at the top right of the game screen. (In the above screenshot, it's close to midnight with very limited visibility.)

NPCs can now also be scripted to go to specific lat/lon locations on the map. There is no pathfinding yet though so they can get hung up on the corners of buildings pretty easily. That will have to be improved upon.

Another content item is if you chop down larger trees they'll leave behind logs of wood which you can sell at the lumbermill.

On the game play side,  I've added a delay between when a character begins an attack animation and when the weapon does damage. Damage now coincides with the instant the weapon's animation touches the target as opposed to the start of the animation. In addition to just looking better, this adds more options to tactical combat (adds the ability to dodge).

Wednesday, November 25, 2020

Backup Generator Power

We frequently lose power in the fall/winter months, and no power means no lights, no refrigerator, no water, and no heat. We had a portable generator and ran extension cords into the house through a cracked door, but that was far from ideal. (And even though the generator was several feet from the barely cracked front door with foam filling the gap, I can still confirm the Carbon Monoxide detector in the house works.)

A very cheap and relatively simple way to tie a generator directly into the house is via an interlock switch. Add a inlet to the outside of the house wired into a circuit breaker in the main electrical panel. The interlock is a simple strip of metal that slides up or down to prevent both the utility main and the generator inlet from both being engaged simultaneously. (Very very bad things happen if utility main power can get to the generator and very very dangerous situations happen if the generator is back filling power to downed power lines.)

Another option is to use a Transfer Switch, but that requires far more wiring as you have to pick specific circuits to be powered by the portable generator and wire them into a separate electrical panel.

The only 2 upsides I know of for a transfer switch is:

1. With an interlock switch, you have to make sure to not enable power hungry devices such as ovens and electric furnaces. With the transfer switch those aren't even available to turn on.

2. With a transfer switch, you can leave the main power enabled so you can know when the power is restored to the house to those few circuits that aren't on the transfer switch.

However the interlock is cheaper and far simpler overall. Definitely the way for me.

There are far better tutorials than mine online on how to do this; the following is really just notes to myself and ways to share it with others I know that are interested in doing it. Disclaimer: The work was permitted / inspected / approved, but I'm not an electrician and you shouldn't trust anything I say.


I patched up a prior hole in the wall that was an old dryer vent. It's at a perfect place underneath the panel and I want to cover up how ugly it looks anyways. Here's a picture of the patched exterior (paint still drying) with a coupler to guide the wire into the house. (I saw other installers just pushing the wire directly through the wall and caulking around it, but that looked pretty poor to me. I like this much better.)

And on the inside... (That's construction adhesive around the patch.)

Total cost for the mini conduit piece and wire clamp was less than $5.

For the plug itself, I went with the Reliance 30-Amp Generator Power Inlet Box for $49.98. I picked it up at the local Lowers but it's readily available online.


The 4.5 out of 5 stars is no surprise, this is a great inlet box. It takes the typical 240V 30 Amp generator extension cord and can be wired to the house panel.

Mounting the box...

For this inlet I needed 10/3 wire. The 10/3 Romex (NM-B) wire that you get at big box stores will have 2 insulated hot wires (red and black), 1 insulated neutral wire (white), and a bare ground. I only needed to go about 6 feet, so I got the smallest bundle from Lowes (15 feet) for $31.69.

This wire is only for interior applications; if you're connecting to anything outside the house then you'll need the exterior grade wire instead. Apparently even though my inlet box is mounted on the outside wall of the house, it's still ok to use the Romex NM-B as it's considered interior wiring. 

Routing the wire into the panel...


Now comes the most difficult part of the whole thing. You must get the proper interlock kit for the panel, and the descriptions on local hardware stores and Amazon are not clear what they're compatible with. I ended up getting part numbers off my electrical panel and contacting Square D customer support. They replied back with the exact interlock kit I needed: "Square D HOMCGK2C Homeline Cover Generator and QOM2 Frame Size Main Breaker Interlock Kit", and it fits perfect.

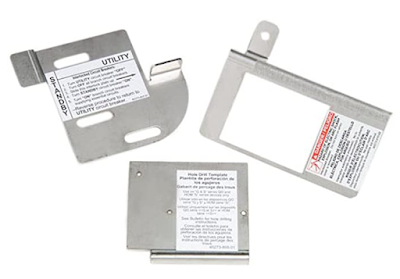
The interlock kit includes a clamp down for the breaker (required by code for any breakers that supply power into the panel) and the metal slide that prevents both the generator inlet and main power from both being simultaneously engaged. $42.89

And to wire the inlet into the panel, I got a Square D Homeline 30 Amp 2-Pole standard circuit breaker. The "2-Pole" is how the breaker is 240V - it connects to both hot wires which are out of phase. If your electrical connection is bridging both hots, then 120 + 120 = 240V. Just $9.95

And here is the installed breaker with the clamp supplied by the interlock kit. The inlet breaker must be installed in a specific spot so the interlock switch can slide over it. I ended up having to move my 240V breaker for the water pump from the bottom left breaker (position 2/4) to the top to make space available.


Mounting the slide was actually a piece of cake. It comes with a template that slots into the holes of the panel cover. Drill some pilot holes with a smaller drill bit then go back with the larger bit. Then you just tighten the slide on with the supplied bolts.

The only problem I had in this process was when the wind blew my instructions onto the only fresh pile of chicken feces on the front porch.

Panel cover back on...


So the panel is good to go now, but the generator needs a bit of work.

Main utility power is a pure 60 Hz sine waveform. That's considered clean power and is what AC (Alternating Current) devices such as refrigerator compressors, water pumps, etc. expect. Portable generators can deliver power as a modified sine wave (basically a square wave or close to it) or a pure sine wave. They're both at 60 Hz, but the square wave shape is not the clean waveform the electrical device is expecting. If the generator creates a pure sine wave, then it's called an "Inverter Generator".

Having a modified sine-wave go through AC motors such as compressors and water pumps can generate additional heat and decrease the life of those devices. How much so? Hard to know. But it made me nervous enough to not want to have my devices on modified sine-waves for extended periods of time. Inverter Generators are more expensive than their modified sine-wave counterparts, but the piece of mind of not worrying if I'm damaging my equipment is worth it.

Of Note: I have an older modified sine-wave generator that I originally planned to run into a UPS then on to my electrical devices. However, standard UPSs will completely reject dirty square wave power and will not charge from them or clean up their power. You can buy UPSs that will accept the dirty power and clean it up to a pure sine wave, but they're so expensive you might as well get an Inverter Generator to begin with.

I ended up buying a Champion 6250-Watt DH Series Open Frame Inverter with Quiet Technology for $1032.17.

It is an "Inverter Generator", has a relative highly continuous load rating (5000 watts), delivers 240V via L14-30R outlet, has very nice maintenance accessibility, and solid reviews. I'm not powering an electric car charger or my electric furnace with this, but it has enough continuous power for the house lights, water pump, refrigerator, and wood pellet stove (to keep the house warm).

One gotcha with tying the generator to the house is whether or not it has a bonded neutral. The 240V L14-30R outlet has 4 wires - 2 hots, 1 neutral, and 1 ground. These portable generators are meant for taking out to a job site, starting them up, and plugging the tools in. For that typical use-case, the generator comes delivered with a bonded neutral - the neutral wire is connected to the frame of the generator alongside the ground wire.

In a house electrical panel, the neutral wires are also bonded to the ground wires along the same bus bars. But apparently some squirrely things can happen if the house has the neutral & ground wires bonded AND the generator has the neutral & ground wires bonded. I won't even pretend to understand it well enough to confidently explain it.

There are plenty of warnings out there to not modify your generator and to use a special GFI transfer switch instead to solve this ground loop problem. However, the official Champion website has instructions and a video explaining exactly how to disconnect the neutral wire to get a "floating neutral". The generator would no longer be safe as a portable device on a job site, but it would no longer have the ground loop problem when tied into the house.

Note on the front of the generator: "NEUTRAL BONDED TO FRAME".


If I used a multimeter to check continuity between the neutral and ground of the 240V outlet, there was no resistance.

The steps are super easy; this generator was definitely made with intention of swapping the neutral connection. Remove the front panel.


The corner terminal has a white wire (the neutral) and a couple ground wires (yellow/green) connected to it. All that has to be done is the neutral wire removed from that bolt and wrapped up so it can't connect to anything.


Reattach the front panel and use the multimeter to confirm that I now have a floating neutral; the neutral is no longer bonded to ground.


Last item to buy was a 15' 30 Amp rated extension cord with NEMA L14-30P/L14-30R ends. After the inspector approved of my wiring, we did a successful test! 


Again I'm not a professional; this is what worked for me and I have yet to burn anything down.

Costs:
$5 Electrical Clamps / Conduit
$49.98 Reliance 30-Amp Generator Power Inlet Box
$31.69 10/3 Romex (NM-B)
$9.95 Square D Homeline 30 Amp 2-Pole Circuit Breaker
$42.89 Square D HOMCGK2C and QOM2 Interlock Kit
$86.30 Electrical Permit
$1032.17 Champion 6250-Watt Generator (5000 Watt continuous, Inverter Generator)
$43.69 15' 30 Amp L14-30 Extension Cord
----------
$1301.67 Total

Thursday, October 29, 2020

RPG: Memory Reduction

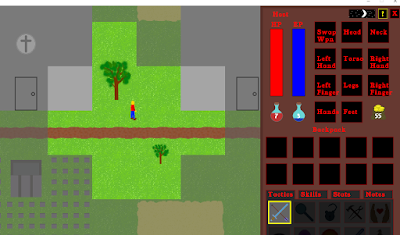
 Although CPU performance was improved to a solid 60 Hz, memory usage skyrocketed.


Each depth of the map has a ground tile and a canopy (roof) tile. When rendering the scene, the ground tile is drawn followed by characters followed by the canopy tile. That way a building roof can be drawn over characters.

For now we have 5 depths (that will grow) and 4 animations for terrain (that will likely increase as well). So: 5 depths x 2 (ground/canopy) x 4 (animations) = 40 tile maps.

I was generating at startup every one of those tile maps. That actually turned out to be totally unnecessary and very memory wasteful. To update all the tiles in a tile map from one level to another (8 in total) only takes a fraction of a second - barely noticeable. So I've replaced 40 tile maps with just the 8 that are in a single depth and the player has a trivial pause when the view switches between depths..

The difference in memory usage is unbelievable - 93% less:


There were lots of graphical glitches with canopies, walking to the edges of building, and other UI elements not redrawing properly that I've also now fixed. Even though the game still looks awful, the underlying engine drawing it is becoming much more capable.

Also did a network test, 3 players all fighting in the world together!


The network test went great. Found a handful of bugs (including an especially funny one of dead players that weren't resurrected quickly getting transported to the middle of the world based on monster respawn logic) but the game was really fun.


Wednesday, September 30, 2020

RPG: Quest for 60 Hz

As I implemented more and more features, the performance went down and down. It got to the point that if I zoomed out all the way, my frame rate would drop to about 1 Hz. In my last post I detailed how my drawing went from thousands of individual draw calls to just a handful for the map. My performance jumped to the upper 30s but still far from where it should be.

The most CPU intensive operation was still drawing, but it was the user interface this time. Every frame every control item (button, text, bar, graphic) was redrawn; each having its own draw call. I reworked the drawing routine to draw all of those controls onto a single texture generated dynamically. Now instead of recalculating / redrawing all the controls every frame, I'm drawing the single dynamic texture every frame. If a control changes (text, visibility, color, etc.), then just that one control is updated onto the dynamic texture. After that change, I was able to get 60 Hz.... most of the time.

The last bottleneck was a simple bug in the A.I. logic that caused entities to check what to do every frame rather than every other second. Once that issue was fixed, I achieved 60 Hz in all cases in the game. Wohoo!

(Frame rate in the capture shows 58, but it's bouncing around 60.)

The CPU is still working harder than I'd like it to. I want the game to be able to run on relatively low powered computers, and I think lower end processors will fail to reach 60 Hz. So more to do, but at least right now it's buttery smooth for development!

Monday, August 31, 2020

RPG: Start of Tile Map, Respawning

Tile Map

Despite the game having poor graphics, I was still having major frame rate issues when the player zoomed out to view the whole map. And each additional feature was making the situation worse. (Surprise, surprise - making over 360x180=64,800 draw calls every frame was slow.)

The solution in SFML (Simple Fast Media Library, the library I'm using) is to make a TileMap. Create a single texture that has all the images your map is going to use. Then instruct the TileMap of which image from the TileMap texture are to be added on the larger game world and where. Have the video card handle all the rendering in one draw call from the TileMap as opposed to 64,800 individual draw calls. (It was actually far more calls than that...)

The result is an order of magnitude increase in performance. Previously when zoomed out frame rates were low single digits. Now I'm reliably getting upper 30s. Performance is still lower than it should be, but there is much room for improvement to pull that up to 60.

The drawing overhaul is not complete. Fog of war and terrain borders aren't even implemented yet, but the new drawing is such a major improvement that it's on the short list to be finished.

Respawning

Previously once a monster was killed, its equipment could be picked up by the player but future versions of that monster wold not have the equipment. For example, only the first instance of the rat killed had a rat hide. The load code has been reworked such that monsters that have been recreated regain their default equipment. This same rat has now been killed twice, leaving behind 2 rat hides.


Lots of other small changes have been made this past month: fixes to networking code, cleanup of items, and the start of a more user friendly store.

The goal for next month is to complete the new drawing routines and the store revamp.

Friday, July 31, 2020

RPG: Hover Info Over Objects

Not too much to show on this RPG update. I am now adding mouse hover labels / hit point bars (when appropriate) to objects on the map.

Mouse over an item tells you what it is...


Mouse over the bed to tell you what happens when you interact with it (including health bar on the off chance you want to break your bed)...


If you mouse over a NPC, it tells you what happens when you interact with it...


If you mouse over an enemy, then you see its health (and nothing happens if you try to interact with it)...


I'm still not entirely sure how I want to handle labels and if they should include what happens when you click to interact, but the options are there now to tweak it.

Other than some minor code cleanup, that's the whole update this month!

Saturday, June 27, 2020

RPG: Multiplayer Items & Effects

Items and effects are now communicating over the network!

Items


The server or the client can pickup or drop an item and that change is reflected across the network. Anything on the ground is managed by the server. Anything held by a player is managed by that game's client.


Next I command the lower right game client to pick up the sword and the upper left game server to pickup the healing potion.


Changes reflect on both games! Lots of cleanup to do in the code, but it's working great.


Effects


Effects are not purely visual (drawing of flames on the ground), they also include abilities such as healing or damaging.

Screenshot of the client putting down a flame wall...


I let my server player get injured...


Then my client player heals him...


A visual effect is drawn on the player receiving the heal on both games and the target player's health increases.


Sunday, May 31, 2020

RPG: Multiplayer Characters

Player and non-player characters are now communicating over the network!


As you can see in the screenshot, items are not being shared between game instances yet.

The type, position, speed, heading, armament, animation, and killed state of characters are sent between games. The position of network characters are dead-reckoned based off the speed and heading of their last update packet to keep the movement smooth and limit packets on the network.


I'm actually quite happy with how smooth the motion is over the network. It's on par with similar network games. Up next will be to send effects and items over the network.


Wednesday, April 29, 2020

RPG: Multiplayer Connect & Chat

Multiplayer work has begun in the RPG!

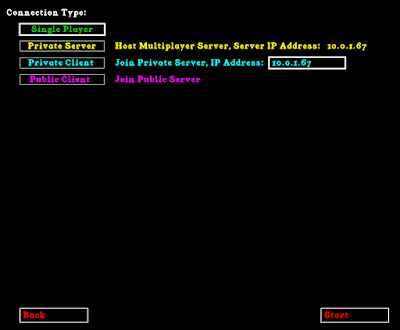
After selecting your character, you pick if you're single player or networked.


My goal is that you will be able to seamlessly go between a single player experience and playing with your friends.

- If "Single Player", then it starts as normal.
- If "Private Server", then it starts the game as a TCP server and will accept client connections.
- If "Private Client", then it will connect to a TCP server.
- If "Public Client", then it will connect to an Internet accessible server. I don't know how feasible this mode will be. For now I'm intending the game to be primarily LAN (Local Area Network) play like Diablo 1. Even if the Internet play shows promise, I want to keep the LAN play fully functional.

I started 2 instances of the game. One as a "Private Server" with a player called "Host". The second instance is with the player called "Player" connecting as a "Private Client" to the server.


And when I click "Start", it attempts to connect to the server. If successful, it starts the game for the client!

On the Server (left window), it announces "Player" has arrived.


You can see sharing character positions is not yet working, but I do have chat messages between the servers and clients functioning. Press enter to bring up the chat box, type in your message, press enter, and it gets sent.


There is no set limit to the number of players that may connect. It'll be interesting to see how well it scales as the numbers of players grow.

Tuesday, March 31, 2020

RPG: Hit Indication, Debug Mode, Dropping Coins

Hit Indication

When you got hit in the game, the only way you knew was from the health bar going down. But that health bar is in the corner of the screen and easy to miss. I'll eventually have sounds for getting hit, but there are plenty of situations when someone won't be able to hear the game. So I wanted something more apparent to the user that they were taking damage.


Solution I came up with turned out very nice. When you get hit, the border of the map pulses red. The harder the hit, the worse the red pulse. Multiple small hits in a short period of time will also cause the red pulse to grow larger.


I also have some lingering red shading if you're injured to give a reminder that you're not at full health.


Debug Mode

As the game get more feature rich, I've been needing to change more and more variables at runtime. The solution was a debug mode. Pressing F10 brings up a little input symbol in the corner.


I can now type commands such as "framerate" or "coins=30".


And adding more commands is very very quick. To support this, I had to add support for text boxes in my SFML windowing system. Which means I could also add the ability to drop coins on the ground!

Dropping Coins

If you click on the player's purse icon, a dialog box now appears asking how much to drop.


Type the new value and push enter and it appears as a purse bag on the ground...


Several other little improvements here and there to the game as well... slow but steady progress.